Heading out the door? Read this article on the new Outside+ app available now on iOS devices for members! Download the app.
Boost your resilience and climb smarter with this training program geared for injury-free climbing by “The Climbing Doctor,” Dr. Jared Vagy. Dr. Vagy will take you through world-class warmups, workouts, and techniques to strengthen your entire body. Enroll today.
I confess: I used to resent slopers. Perfect circles, rounded arêtes, open-handed jugs, the topouts of boulders—you name it. Every few times that I slapped, grabbed, or hung on for dear life from those sloping devils, my wrists popped and seared in pain. It felt like the weight of my body was about to separate my forearms from my hands. Unsurprisingly, I became wary of climbs littered with these holds.
But I soon tired of skipping classic boulders because of a single compression move or insecure topout. I resolved to figure out how I could overcome my discomfort and, dare I say, even enjoy them. Join me as I break down the harsh nature of slopers, demonstrate key wrist-stabilizing exercises, and review techniques that can help you sloper to the best of your abilities.
Wrist and Forearm Anatomy
To understand why our wrists may feel unstable with slopers, we must first grasp the wrist’s basic anatomy. The main bones of the wrist are the eight carpal bones, which are situated between our forearm bones (radius and ulna) and metacarpals. The carpals are arranged into two rows and are connected to one another by a web of ligaments. These eight bones are then connected to the radius and ulna by many other ligaments as well as a structure called the triangular fibrocartilaginous complex (TFCC).1 Together, these ligaments and the TFCC passively stabilize the wrist joint.
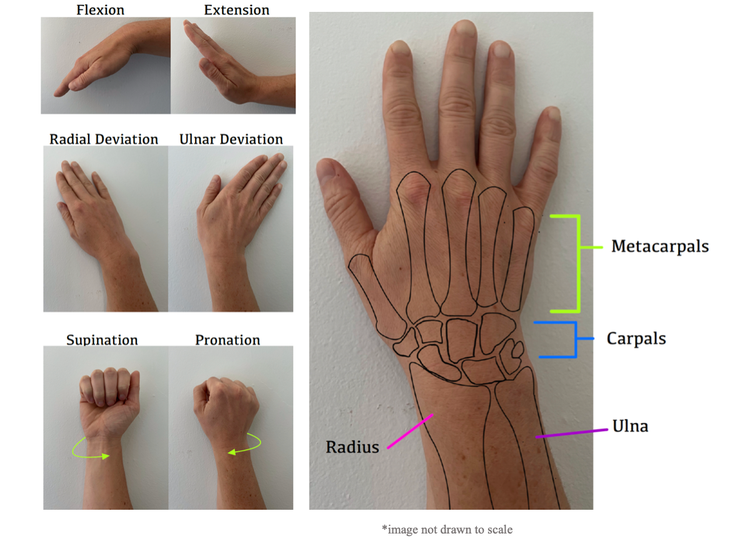
Next, a majority of the muscles in our forearms cross over the carpals via tendons and attach to the metacarpals, serving as the primary movers and dynamic stabilizers of the wrist.1 These muscles allow for wrist flexion, extension, radial deviation, ulnar deviation, and can assist in forearm pronation and supination. Some of these tendons that cross the wrist also attach to our fingers, serving as the primary finger movers, while secondarily assisting motion at the wrist.
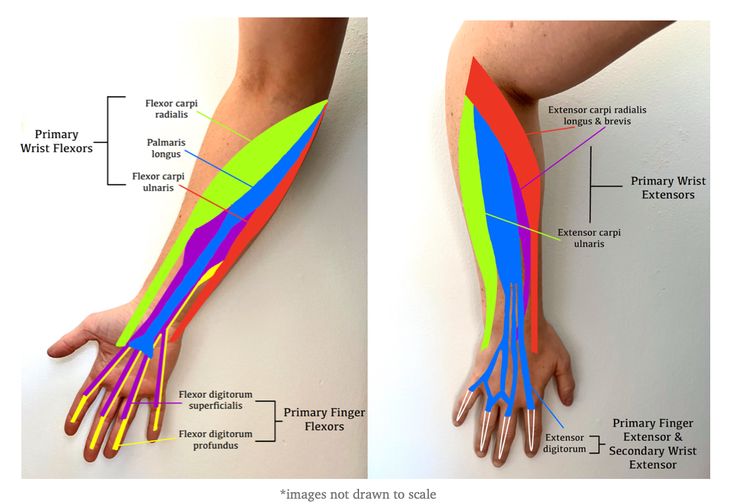
Additionally, each muscle that crosses the wrist connects to a different part of our hand, and subsequently applies force in a different direction. If we want to isolate the position of our hand to resist an outside force, opposing muscles on various sides of the hand (namely our flexor-extensor antagonist muscle pairs) need to contract at the same time, or co-contract, to hold the wrist and fingers in this desired position1,4,6. When these muscles co-contract, they induce stiffness and protect the joint from excessive forces.14,18 Not only do we need these muscles to co-contract forcefully, but we also need them to contract in a coordinated and timely manner to effectively stabilize the wrist.4,7,11
Slopers and the Wrist
Ah yes, these rounded, sloped holds that some people love and some despise. As slopers generally lack large features to crimp or pinch, we are heavily reliant on the friction of an open-hand grip and wrist flexor strength, as opposed to just finger flexor strength to push our entire hand as a unit into the hold. Therefore, our wrists are often required to be in a slightly flexed or bent position to get the most purchase with the hold’s surface.
Due to this open-hand and flexed wrist position, our wrist extensors can be less engaged than they would be on most other holds that we can clamp our fingers on.¹ Increased tensile or “stretching” forces across the wrist can occur as a result of this reduced muscular stabilization.9 Furthermore, this slightly flexed, open-hand position is the loose pack position of the wrist.1,10 When a joint is in its loose pack position, there is less congruency between the bones that make up the joint and the supporting ligaments are less taut.1
The combination of decreased muscular stabilization and loose pack position can make it easier for the wrist joint to move in an uncomfortable manner on slopers (i.e., popping or gapping sensation) as there is less overall stability of the joint. Some of us may also have increased laxity in our wrist ligaments,11 allowing for more movement of the joint in these wrist-demanding scenarios.
To improve our ability to hold slopers with stability, we can address the balance of strength across the wrist and train our muscles to engage in a timely manner! By training the muscles that act directly on our wrist, we can build up the joint’s dynamic support that we need for slopers. Additionally, we can work muscle groups that enhance our overall body tension which is further needed to secure our position on slopers. Just as we tackle projects and training goals, we can take on slopers and our wrists. With some stabilizing exercises and training methods, let’s give our wrists the attention they deserve.
Warm-up
In order to prepare the muscles that cross our wrists and fingers to optimally produce force, they need to be primed to move. The following warm-up exercises get our muscles and tendons mobilized and stabilized in various positions.12 It is suggested that these warm-up techniques are performed in conjunction with a full-body warm-up.
Off the Wall
Forearm Tendon Glides
- These gliding motions allow our forearm tendons to lengthen and shorten at the wrist and elbow, which prepares the muscles to optimally contract
- Perform this 3 times for 30 seconds on each hand
- Try performing these motions in climbing-specific positions in order to further engage the shoulder and scapular muscles
Finger Tendon Glides
- These gliding motions increase the flexibility of our finger tendons and muscles
- Perform this 3 times for 30 seconds on each hand
- Try performing these motions in climbing specific positions in order to further engage the shoulder and scapular muscles
Wrist Stabilizer Rotations
- This exercise forces our wrist extensors to contract, stabilizing our wrists against the resistance of the band
- With your elbows bent at your side, push out against the resistance band with the back of your hands
- Make sure your wrists are kept in a neutral or “straight” position to ensure the extensors are working
- With one wrist held still, perform clockwise and counterclockwise circles with the other wrist
- Perform this 3 times for 30 seconds at each wrist
On the Wall
When warming up on the wall, use this period to focus on your foot and hand placement. Try to use a variety of grip positions and be mindful of using an open-hand grip even if you are not on a sloper. As warm-up climbs should be easier than your projects and have fewer demands for high force producing full or half crimps, this is a great place to begin incorporating the open-hand position. While using this grip on a non-sloper can be different than using it on a sloper, practicing this grip on various holds can translate into increased open-hand control in general. This grip position has also been shown to be less prone to some types of finger pulley injuries,13 so it looks like a win-win to me.
Sloper Stabilizer Training (Off the Wall)
It is time to promote stability across our wrists. Before trying any of the below exercises, please view the section titled “When to See a Medical Practitioner” to determine if your wrist pain or associated symptoms would best benefit from the evaluation of a medical professional. When engaging in any new form of training, I encourage you to listen to your body and make modifications to activity if there is discomfort. Ensure that you are incorporating adequate rest periods and are tracking your training volume and intensity. Also, keep in mind that the muscles we are targeting here are your forearm muscles that attach at the elbow. If you are new to this type of training, initially feeling slight soreness in your forearms or elbows is not uncommon.
Wrist Strengthening
The series of the exercises below are a great way to begin strengthening various muscles that act on the wrist. Ideally, these exercises are performed 2-3 times a week on non-consecutive days.
Isometric Wrist Extension and Flexion
These exercises target the wrist extensors and flexors.
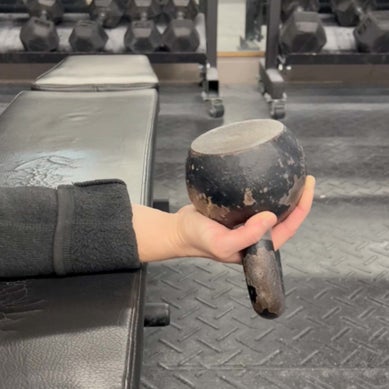
- Find a training device with a diameter that forces you to use more of an open-hand grip
- Here, I am using a warm-up board with an added carabiner secured by a girth hitch
Extensors
- Position the weight on the finger side of the device.
- With your shoulder blades and posterior chain engaged and a slight bend at the elbow, lift the weight off the ground
- Fight the pull of the weight from drawing your fingers towards the ground
Flexors
- Position the weight on the thumb side of the device
- With your shoulder blades and posterior chain engaged and a slight bend at the elbow, lift the weight off the ground
- Fight the pull of the weight from drawing your fingers towards the ceiling
Suggested protocols based on training goals from Dr. Tyler Nelson DC, MS, CSCS, and owner of Camp4 Human Performance are below.14 If you are unsure which protocol to follow, hypertrophy is a great place to begin. As you gain a solid base within the hypertrophy phase, you may begin working towards strength endurance or peak force. Follow each set with a 2 minute rest period.
- Hypertrophy training: Lift to failure for 20-40 seconds at 65-75% of your max weight (1 set). Perform 3-5 sets
- Strength endurance training: 5-second lift, 3-second rest. Perform 4-6 reps at 85% of your max weight (1 set). Perform 4-6 sets
- Peak force training: Heavy as you can lift and hold for 5 seconds (1 set). Perform 5-7 sets
Don’t have a training device such as the one used in the videos? Check out these options. You may use the same protocols listed above, just keep in mind that you are not “lifting” or curling the weight in the exercises below. Instead, you are holding the weight with your wrist kept in the same position throughout each rep.
Extensors
-
Place your forearm palm down on a weight bench with your wrist in neutral (in line with your forearm)
- Hold a dumbbell in your hand and maintain a neutral wrist position, fighting the weight from moving the front of your hand towards the ground
- Maintain forearm contact with the weight bench throughout

Flexors
- This time, support your forearm palm up on a weight bench with your wrist in neutral
- Hold a kettlebell with an open hand as this isolates the wrist flexors, preventing the finger flexors from providing as much assistance and stability to motion as they would with a closed-grip
- Maintain a neutral wrist position, fighting the weight of the kettlebell from moving the back of your hand towards the ground
- Maintain forearm contact with the weight bench throughout
Wide Pinch Grip Repeaters
This exercise targets pinch strength while also working the wrist extensors. It is helpful for stabilizing the open-hand position as it trains the wrist extensors with the fingers held in extension. This exercise can also resemble hand positioning on flat, slopey topouts that necessitate pushing through the pads of all the fingers (thumb included) to avoid slipping off.
- Use the widest pinch block possible and hold it with just the pads of your fingers and thumb
- With your shoulder blades and posterior chain engaged and a slight bend at the elbow, lift the weight off the ground
A suggested protocol from climbing researcher, coach, and author Eric Hörst is listed below15
- Determine your training weight by finding the maximum weight that you can hold for 12 seconds
- With one hand, hold the pinch for 7 seconds, and then immediately repeat this on the other hand
- Perform 6, 7 second holds on each hand (1 set)
- Perform 2-3 sets with a 3-5 minute rest period in between
Finger Extension
This exercise targets our often overlooked finger and wrist extensors. These muscles help to secure an open-hand position and balance the forces produced by our wrist and finger flexors, optimizing the stability of our wrist.
- Open your hand against the band, hold for 5 seconds and then close
- Keep your wrist in a neutral position (in line with your forearm) as this further engages the wrist extensors and prevents the flexors from dominating. Also, try to keep an arch in your palm throughout the motion
- Use a band with a resistance that causes fatigue on the top of your hand and forearm by the end of 10-15 reps (1 set), yet you can control and move through the entire range of motion for each rep
- Perform 3 sets on each hand with a 1-2 minute rest between sets
- Try performing this exercise in climbing specific positions to further engage the shoulder and scapular muscles
While the above exercises may be more specific for wrist strength on slopers, the exercises below serve as helpful adjuncts for overall wrist stability.
Pronation/ Supination with PVC Pipe
These exercises target the forearm supinators and pronators
- This can be performed in a standing position with your elbow bent at your side or with your forearm supported on a surface
- If you are using a PVC pipe, the more pipe length that you have sticking up away from your hand, the harder it will be
- If the PVC pipe is too light, you can try using a dumbbell or even a pot with a handle at home
- For both exercises, find a length of PVC pipe that causes fatigue in your forearm by the end of 8-12 reps (1 set), yet you can control and move through the entire range of motion for each rep
- Perform 3 sets on each hand with a 1-2 minute rest between sets
- Feel free to combine the supination and pronation exercises, with one rep consisting of palms down, to palms up, and then back to palms down
Supination
- While holding the PVC pipe, turn your palm down to the ground and then back up to the starting position
- Our supinators work to control the palm down motion and then create the palm up motion
Pronation
- This time, turn your palm up to the sky and then back up to the starting position
- Our pronators work to control the palms up motion and then create the palms down motion
Radial/ Ulnar Deviation with PVC Pipe
These exercises target the wrist ulnar and radial deviators
- This can be performed in a standing position with your arm by your side and a slight bend in the elbow
- Again, feel free to use a dumbbell instead of a PVC pipe
Ulnar Deviation
- With the longer end of the PVC pipe sticking out behind you, curl the pinky side of your wrist up and then return to the starting position
- Find a length of PVC pipe that causes fatigue on the pinky side of your forearm by the end of 8-12 reps (1 set), yet you can control and move through the entire range of motion for each rep
- Perform 3 sets on each hand with a 1-2 minute rest between sets
- If you are using a PVC pipe, the more pipe length that you have sticking behind you, the harder it will be
Radial Deviation
- With the longer end of the PVC pipe sticking out in front of you, curl the thumb side of your wrist up and then return to the starting position
- Find a length of PVC pipe that causes fatigue on the thumb side of your forearm by the end of 8-12 reps (1 set), yet you can control and move through the entire range of motion for each rep
- Perform 3 sets on each hand with a 1-2 minute rest between sets
- If you are using a PVC pipe, the more pipe length that you have sticking in front of you, the harder it will be
Neuromuscular Control and Body Tension
The exercises below target muscle groups that are necessary to maintain overall body tension with slopers in addition to shoulder and wrist neuromuscular control. Neuromuscular control can be defined as the anticipatory control of muscles around a joint as well as the ability to unconsciously retain an adequate posture and maintain joint stability and equilibrium.3 Essentially, it’s our body’s ability to effectively coordinate muscle contractions in a proactive and reactive manner based on the task at hand. By challenging the control of our wrists and shoulders in the exercises below, we can promote stability through the upper extremity as a whole. Ideally, these exercises are performed 2-3 days a week in conjunction with the wrist strengthening exercises.
Half-Kneeling Bottoms Up Kettlebell Press
- In a half-kneeling position, hold the kettlebell by the handle with the rounded portion sticking up in the air
- For comfort, use a mat underneath your bottom knee
- Ensure your wrist is in a neutral position (in line with your forearm) and that you are not letting your wrist bend from the weight of the kettlebell
- With your shoulder and elbow 30 degrees to the side, press the kettlebell up in the air while preventing the movement of the weight from shifting your neutral wrist position
- Engage your core, preventing the overhead motion from shifting your trunk position
- Return to the starting position by controlling the weight back down
- Use a weight that causes fatigue in your shoulder by the end of 8-12 reps (1 set), yet you can control and move through the entire range of motion while maintaining your trunk and wrist position for each rep
- Perform 3 sets on each arm with a 1-2 minute rest between sets
- Try performing this in front of a mirror to ensure your shoulder and wrist remain in the same plane of motion and that your trunk is steady throughout the movement
BOSU Mountain Climbers
- In a high plank position, place both hands on the flat surface of the BOSU ball
- Alternate bringing one knee to your chest, increasing the speed for difficulty
- Perform 3-4 sets of 30 second – 1 minute bouts
- Challenge yourself to keep the BOSU stable and still, resisting the movement of your body from your alternating leg motion
Ring or TRX Chest Fly
- Place the rings or TRX straps in both hands
- With a slight bend in your elbow, open your arms to the side while keeping tension throughout your core and posterior chain as your body moves towards the ground
- Perform 3 sets of 10-15 reps with a 1-2 minute rest between sets
- To decrease the difficulty, position yourself further away from the anchor of the straps so that your body moves through a smaller range of motion or perform the motion on your knees
BOSU Pushups
- Perform a pushup with both hands on the flat surface of the BOSU ball
- Perform 3 sets of 10-15 pushups with a 1-2 minute rest between sets
- Challenge yourself to keep the BOSU stable and still, resisting the movement of your body as you move up and down in the pushup
Sloper Stabilizer Training (On the Wall)
Well, here we are. Whether we like it or not, as climbers, we cannot avoid slopers for the rest of our lives. While off-the-wall stabilizer exercises offer some great ways to strengthen and stabilize our wrists, we must follow them up with some sloper training on the wall. The below training methods offer a way for you to work overall neuromuscular control and contact strength on slopers.
Contact strength in climbing is often defined as the rate of force development in our fingers.16 Essentially, it is how fast you can call upon the finger strength needed to control your grasp on a hold. In the case of slopers, we can also apply contact strength principles to our wrists. With training, we can enhance our ability to quickly engage muscles that act on the wrist. In developing this, we can prepare our minds and bodies to effectively stabilize and control our wrists on slopers.
REMINDER: variability is key! Even though we may be focusing on slopers, we need to continue to work on climbs with other hold types to ensure that we do not overload our wrists. Additionally, I suggest performing the exercises in the “Off-the-Wall” sections consistently for at least 2-3 weeks before dedicating specific training to slopers in the section below.
Contact Strength Variations
The drills below can be performed on a campus board or systems board with slopers or sloper rungs. Following a thorough warm up, they should be performed at the beginning of your session when you are fresh.17 The goal of these drills is not to feel fatigued, but rather, it is to generate force and control at our wrist and hands as quickly as possible. Adjust your sets/reps within the suggested ranges below and allow for adequate rests between sets to ensure each rep is performed with as much speed and control as your first rep.
One of these drills can be performed 1-2 times a week on non-consecutive training days. The velocity hang is a great place to start and both of the drills below can be followed up with some sloper use on the actual climbing wall.
Sloper Velocity Hang16,17
- Start with both hands slightly hovering over a sloper rung or two slopers that are just above your head
- Quickly catch the hold as you simultaneously remove your feet from the ground
- Upon contact, push your wrist and hand as a stiff unit into the hold
- Keep your shoulders and elbows engaged (shoulders away from your ears, slight bend in the elbow)
- Try to limit your swing as you catch the hold by creating tension throughout your body
- Hold and control the movement for 1-2 seconds and then drop down
- Perform 3-5 hangs with a quick rest to reset between hangs (1 set)
- Perform 4-5 sets with a 3-5 minute rest between sets
- To vary this drill, try different spacing between your hands or off-set your hands
Sloper Jump Latch16
- This targets our contact strength in a further dynamic manner
- Keep in mind that this drill places higher demands on the latching arm. If you are unable to keep the wrist, elbow, or shoulder of that arm engaged, opt for performing the velocity hang with off-set hands
- Start with one hand on a sloper and both feet on the ground
- Maintain contact with that hand and jump to latch a sloper with the other
- Upon contact, push your wrist and hand as a stiff unit into hold
- While latching the hold, keep your shoulders and elbows engaged
- Try to limit your swing as you latch the hold by creating tension throughout your body
- Hold and control the movement for 1-2 seconds and then drop down, repeating the same for the other hand
- Perform 2-4 latches on each hand with a quick rest in between each latch to reset (1 set)
- Perform 4-5 sets with a 3-5 minute rest between sets
- To increase the difficulty, try latching a hold that is further away or minimize the use of your bottom hand
Let’s Put it All Together on the Wall
- Try out moves to slopers of different sizes, shapes, and at various angles on the spray wall or actual bouldering wall
- Move from non-slopers to slopers and vise-versa
- Try the velocity hang or jump latch on the wall as opposed to on the campus board/ systems board
- Try to formulate routes that incorporate slopers in a static or dynamic manner
- Consider filming yourself to get a sense of your movement on the wall
- Don’t be afraid to get creative and re-create moves that have given you trouble in the past! This is also a great place to incorporate some sloper techniques listed below
Technique Considerations for Slopers
- Use body tension! Try heels hooks and toe hooks to pull your hips into the wall. Engage your core, chest, back, shoulders, and even your toes on foot placements to further keep your body from swaying away from the wall.
- Keep your body’s center of mass in line with and under your hand’s line of pull, as this creates opposition to help you stay on the hold.
- Try different hand positions and finger spacing on the hold to determine how you can best disperse your hand contact.
- Look for sweet spots on the hold such as divots or small bumps.
- Consider foot placement. Is your foot placement pushing your hips away from the wall, causing you to lose opposition with the hold?
- Be efficient. Sequence your route before getting on and commit to each move.
- Use imagery and a positive mindset so that you are hitting the hold with purpose and body tension.
- Don’t forget to brush the holds!
Here we are at the end of this sloper saga. I’ll admit, slopers still aren’t my favorite. However, after dedicating some training time to strengthening and stabilizing my wrists, both on and off the wall, I appreciate these holds now more than ever. With consistency, I have noticed a drastic difference in my ability to sloper with stability – and the same can be true for you.
When to see a Medical Practitioner
Physical therapists are trained to perform movement assessments and work with you to create an individualized treatment plan. As the wrist is an incredibly complex joint, certain signs and symptoms suggest that you may benefit from partnering with a medical professional:
- Pain/ popping/ clunking feeling in the wrist limiting your ability to perform activities throughout your day18,19
- Chronic wrist pain and/or sense of instability that is preventing you from climbing
- Inability to move your wrist due to pain or swelling
About the Author

Jennifer Yarin is currently a third year student in Boston University’s Doctor of Physical Therapy Program and is a member of the Physical Therapy Rock Climbing Special Interest Group. She began climbing in 2008 and enjoys bouldering and sport climbing. In her free time, she coaches youth climbing at a local rock gym and trains for climbing. As a New England native, she especially loves climbing in Rumney, NH and various other locations along the east coast. She hopes to combine her passion for learning, climbing, and rehabilitation into providing the best individualized care for her future patients. To connect with Jen, feel free to reach out at jdyarin@gmail.com or follow her recent adventures on Instagram @jen_yarin.
About the Contributors

Dr. Jared Vagy “The Climbing Doctor,” is a doctor of physical therapy and an experienced climber, has devoted his career and studies to climbing-related injury prevention, orthopedics, and movement science. He authored the Amazon best-selling book Climb Injury-Free, and is a frequent contributor to Climbing Magazine. He is also a professor at the University of Southern California, an internationally recognized lecturer, and a board-certified orthopedic clinical specialist.
To learn more about Dr. Vagy you can visit theclimbingdoctor.com or visit him on Instagram @theclimbingdoctor

Jennifer Demyanek is a physical therapist, college professor, and rock climber in Las Vegas, Nevada. She is a graduate of the University of Maryland School of Medicine with a Doctorate degree in Physical Therapy. Jennifer is the owner of Onsight Movement, a private physical therapy practice located in Las Vegas, specializing in treating rock climbing injuries and improving climbing performance. She also currently serves as Adjunct Faculty at the College of Southern Nevada teaching Anatomy & Physiology.
Jennifer is an officer of the virtual Rock Climbing Special Interest Group as well as a member of the American Physical Therapy Association’s Orthopedic Section. She also holds a certification in Dry Needling from the American Academy of Manipulative Therapy. When not practicing physical therapy, Jennifer can be found outside rock climbing around the southwest or spending time with her husband, Dylan. You can contact Jennifer via email at jennifer@onsightmovement.com or by visiting www.onsightmovement.com.

Kevin Cowell is a physical therapist, clinical instructor, and rock climber based out of Broomfield, CO. Kevin owns and operates The Climb Clinic (located at G1 Climbing + Fitness) where he specializes in rehab and strength training for climbers and mountain athletes. He found his passion for climbing in Colorado while attending Regis University for his Doctorate of Physical Therapy and has since become a Certified Strength & Conditioning Coach (CSCS), Board-Certified Orthopaedic Clinical Specialist (OCS), and a Fellow of the American Academy of Orthopaedic Manual Physical Therapy (FAAOMPT).
You can contact Kevin via email at kevin@theclimbclinic.com or by visiting www.theclimbclinic.com. Also, be sure to follow Kevin at @theclimbclinic on Instagram for free rehab and strength training resources.
The Research
- Levangie, P. K., (2011). The Wrist and Hand Complex. In Joint Structure and Function: A Comprehensive Analysis (5th ed.) F. A. Davis Company.
- Beringer, C. R., Mansouri, M., Fisher, L. E., Collinger, J. L., Munin, M. C., Boninger, M. L., & Gaunt, R. A. (2020). The effect of wrist posture on extrinsic finger muscle activity during single joint movements. Scientific Reports, 10(1), 1–11. https://doi.org/10.1038/s41598-020-65167-x
- Hagert, E. (2010). Proprioception of the Wrist Joint: A Review of Current Concepts and Possible Implications on the Rehabilitation of the Wrist. Journal of Hand Therapy, 23(1), 2–
- Harwood, C., & Turner, L. (2016). Conservative management of midcarpal instability. Journal of Hand Surgery: European Volume, 41(1), 102–109. https://doi.org/10.1177/1753193415613050
- Milner, T. E. (2002). Adaptation to destabilizing dynamics by means of muscle cocontraction. Experimental Brain Research, 143(4), 406–416. https://doi.org/10.1007/s00221-002-1001-4
- Vigouroux, L., Goislard de Monsabert, B., & Berton, E. (2015). Estimation of hand and wrist muscle capacities in rock climbers. European Journal of Applied Physiology, 115(5), 947–957. https://doi.org/10.1007/s00421-014-3076-6
- Hincapie, O. L., Elkins, J. S., & Vasquez-Welsh, L. (2016). Proprioception retraining for a patient with chronic wrist pain secondary to ligament injury with no structural instability. Journal of Hand Therapy, 29(2), 183–190. https://doi.org/10.1016/j.jht.2016.03.008
- Karagiannopoulos, C., & Michlovitz, S. (2016). Rehabilitation strategies for wrist sensorimotor control impairment: From theory to practice. Journal of Hand Therapy, 29(2), 154–165. https://doi.org/10.1016/j.jht.2015.12.003
- Chang, E. Y., Chen, K. C., Meunier, M. J., & Chung, C. B. (2014). Acute short radiolunate ligament rupture in a rock climber. Skeletal Radiology, 43(2), 235–238. https://doi.org/10.1007/s00256-013-1717-1
- Hooper’s Beta (2021, February 7). Why Does My Wrist Feel Painful or Unstable When Climbing on Slopers?. Youtube. Retrieved February 23, 2022, from https://www.youtube.com/shorts/GlLz3Aw9zus
- Zelenski, N. A., & Shin, A. Y. (2020). Management of Nondissociative Instability of the Wrist. Journal of Hand Surgery, 45(2), 131–139. https://doi.org/10.1016/j.jhsa.2019.10.030
- Vagy, J. (2021, September 13). Warm-up right: How to prep wrists and fingers to send. Climbing. Retrieved February 23, 2022, from https://www.climbing.com/skills/warm-up-right-how-to-prep-wrists-and-fingers-to-send/
- Schweizer, A., & Hudek, R. (2011). Kinetics of crimp and slope grip in rock climbing. Journal of Applied Biomechanics, 27(2), 116–121. https://doi.org/10.1123/jab.27.2.116
- Nelson, T. (2022, January 3). Using the Wrist Wrench. Instagram. Retrieved February 22, 2022, from https://www.instagram.com/p/CYRusGfOCsD/
- Hörst, E. (2022, January 12). Effective Pinch-Grip Training for Climbers. Training 4 Climbing. Retrieved February 23, 2022, from https://trainingforclimbing.com/pinch-grip-repeater-training-for-climbers/
- Hampton, K. (2021, April 5). How to train contact strength: A spectrum of exercises for climbers. Power Company Climbing. Retrieved February 23, 2022, from https://www.powercompanyclimbing.com/blog/contact-strength-spectrum
- Hooper’s Beta (2022, January 10). How to Train Contact Strength (A Climbing Nerd’s Investigation Part 3/3). Youtube. Retrieved February 23, 2022, from https://www.youtube.com/watch?v=NLePCAp-uuo&t=1s
- Doarn, M. C., & Wysocki, R. W. (2016). Acute TFCC Injury. Operative Techniques in Sports Medicine, 24(2), 123–125. https://doi.org/10.1053/j.otsm.2016.02.001
- Lee, D. J., & Elfar, J. C. (2015). Carpal Ligament Injuries, Pathomechanics, and Classification. Hand clinics, 31(3), 389–398. https://doi.org/10.1016/j.hcl.2015.04.011