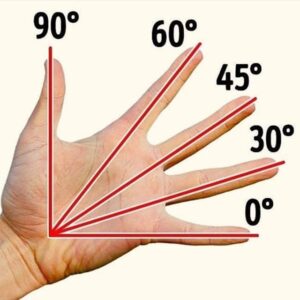


Range of motion refers to the directions and limits of movement in each joint of the body. During evaluation, range of motion is measured using a full circle, half circle, or finger goniometer. To measure range of motion of a joint, the stationary arm of the goniometer is placed parallel to the longitudinal axis proximal to the joint, and the movable arm is placed parallel to the longitudinal axis distal to the joint. The goniometer must be placed in correct alignment with the joint for the measurement to be accurate. Measurements are always recorded in degrees of movement.
Types of ROM
Passive Range of Motion (PROM) – the amount of movement measured while the therapist moves the joint with no help from the patient.
Active Range of Motion (AROM) – the amount of movement measured while the patient actively moves the joint.
Active Assistive Range of Motion (AAROM) – the amount of movement measured while the patient actively moves the joint with gravity eliminated or with assistance from the therapist.
Within Normal Limits (WNL) – range of motion is within the normal range of measurement for that specific joint. The therapist must measure the joint and compare it to the normative data.
Within Functional Limits (WFL) – range of motion is functional for the particular tasks that the patient needs to complete. This can be different depending on the patient and what he or she needs to do. To determine that range is WFL, the therapist must observe functional movement and functional tasks, such as observing a patient getting dressed.
A screening can be completed when no functional range of motion limitations are expected based on the patient’s diagnosis.
Scapula and Shoulder Movements
The Shoulder Girdle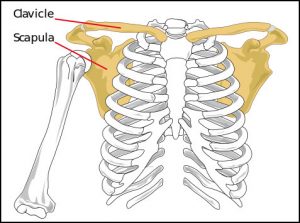
The shoulder girdle, also called the pectoral girdle, is formed by:
• the scapulae, posteriorly,
• the clavicles anteriorly
• manubrium of the sternum, anteriorly
The girdle functions as the anchor that attaches the upper extremities to the axial skeleton. The glenohumeral joints/shoulder joints and the shoulder girdle work together in carrying out upper extremity activities.
The shoulder girdle muscles
– Stabilize the scapula so the shoulder joint will have a stable base from which to move the humerus
– Contract to maintain the scapula in a relatively static position during shoulder joint actions
– Contract to move the shoulder girdle and to enhance movement of upper extremity when the shoulder goes through extreme ranges of motion.
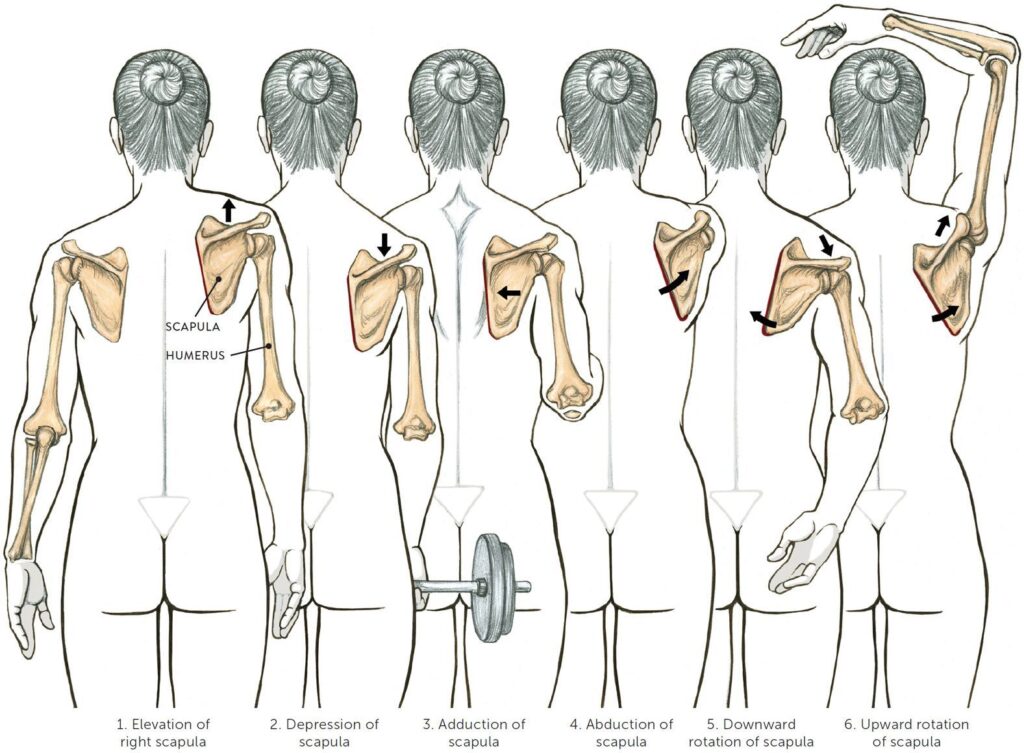
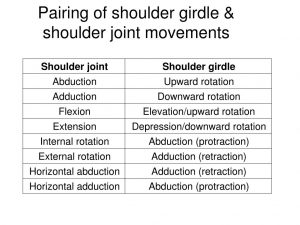
Movements of the scapula
The pectoral girdle or more specifically, the scapula movements includes:
1. Elevation: movement that allows the shoulder girdle to move upwards as in shrugging the shoulders.
2. Depression: the reverse of the elevation movement. The pectoral girdle and entire shoulder move downwards.
3. Scapular Abduction – also called scapular flexion or protraction. A movement where the scapula moves laterally away from the spinal column.
4. Scapular Adduction – also called scapular extension or retraction. This movement pulls the scapula back towards the rib cage. Pinching the shoulder blades together illustrates adduction of the shoulder girdle.
5. Downward rotation: rotating the lower scapula towards the rib cage as in moving the arm behind the back.
The Glenohumeral Joint
The glenohumeral joint/shoulder joint allows a wide range of movements including flexion, extension, abduction, adduction, rotation (medial and lateral rotation), and circumduction.
Movements of the shoulder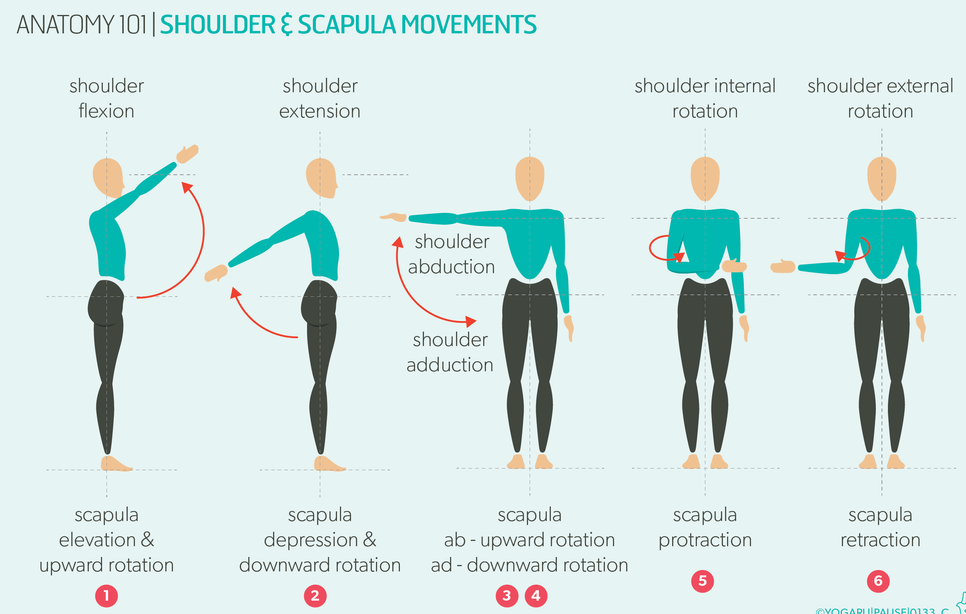
1. Forward Flexion – The anterior movement of the humerus or upper arm at the glenohumeral joint.
2. Extension – A posterior movement of the humerus at the glenohumeral joint.
3. Abduction– A movement of the arm away from the midsagittal plane of the trunk. This movement involves both glenohumeral joint motion and movement of the shoulder girdle.
4. Adduction – A movement of the arm toward the midsagittal plane of the trunk.
5. External Rotation – also called lateral or outward rotation. A movement around the long axis of the humerus at the glenohumeral joint . When the elbow joint is flexed to 90’ external rotation would cause the hand to move laterally or away from the midsagittal plane of the body.
6. Internal Rotation – also called medial or inward rotation. A movement around the long axis of the humerus causing the hand, with the elbow flexed to 90’ to move toward the midsagittal plane of the body.
Scapulohumeral Rhythm
Scapulohumeral rhythm (also referred to as glenohumeral rhythm) is the kinematic interaction between the scapula and the humerus. This interaction is important for the optimal function of the shoulder. Both joints work in synergy to accomplish the desired action of the entire upper extremity. This synergy between scapula & shoulder joint muscles enhance movement of entire upper extremity.
Example: To raise our hand out to the side laterally as high as possible, the serratus anterior & trapezius (middle & lower fibers) muscles upwardly rotate the scapula as supraspinatus & deltoid initiate glenohumeral abduction.

Goniometer
Positioning is an important part of goniometry as it is used to place the joints in a zero starting position and helps to stabilize the proximal joint segments. Positioning also affects the amount of tension in soft tissue structures (capsule, ligaments, muscles) surrounding a joint. A testing position in which one or more of these soft tissue structures become taut results in a more limited ROM than a position in which the same structures become relatively lax.
The measurements for some ROMs vary, depending on which reference is used.
The image below illustrates the different values of ROM from 3 different sources:

| Joint and Motion | Goniometer Axis Placement | Stationary Arm Placement | Movable Arm Placement | Normal Range | Photo/Video |
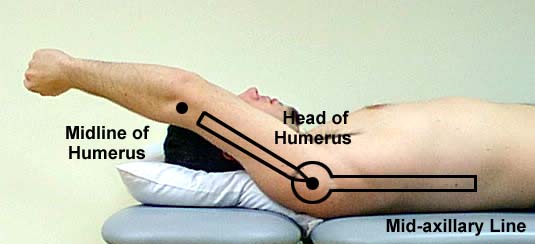
| Shoulder Flexion | On the lateral surface of the glenohumeral joint, about 1 inch below the acromion process. | Parallel to the midline of the trunk. | Parallel to the lateral surface of the longitudinal axis of the humerus. | 0-180°
167° – American Academy of Orthopaedic Surgeons 150° – American Medical Association 166° – Boone and Azen |
Demonstration of goniometer measurement of shoulder flexion and shoulder abduction.
|
| Shoulder Extension | On the lateral surface of the glenohumeral joint, about 1 inch below the acromion process. | Parallel to the midline of the trunk. | Parallel to the lateral surface of the longitudinal axis of the humerus. | 0-60°
62° American Academy of Orthopedic Surgeons 50° American Medical Association 62.3° Boone and Azen |
Demonstration of goniometer measurement of shoulder extension.
|
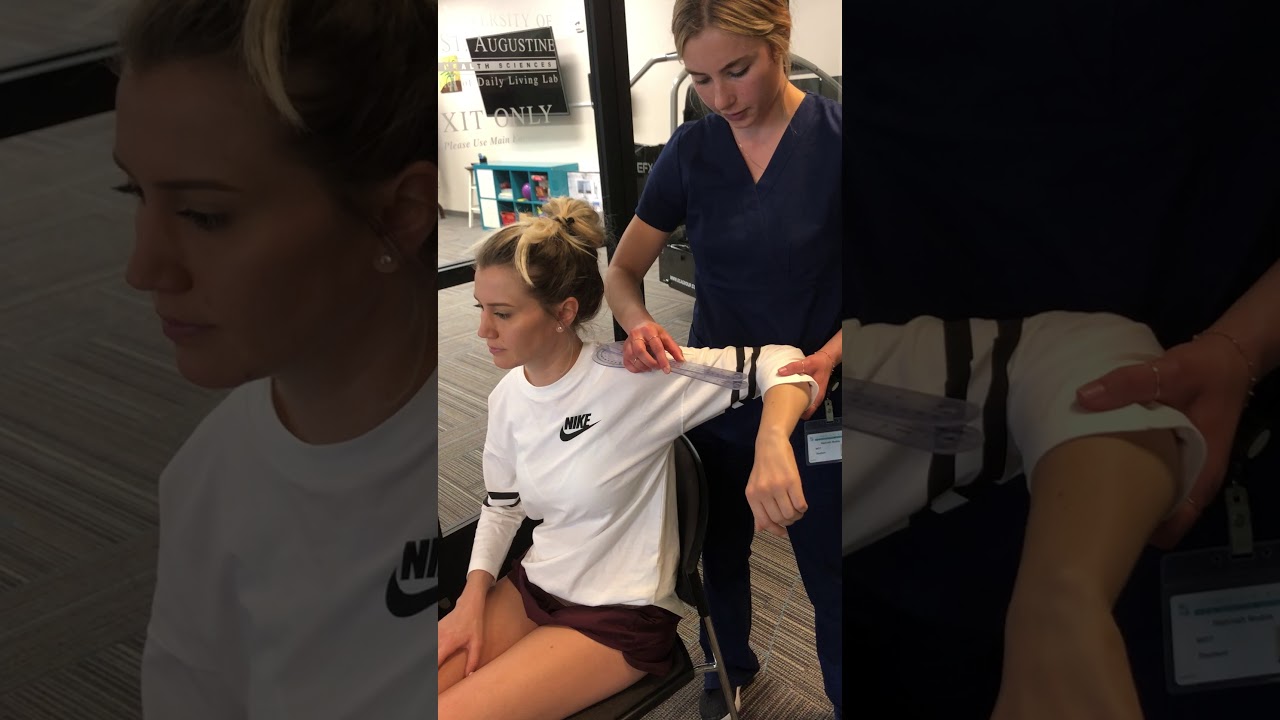
| Shoulder Abduction | A point on the surface of either the anterior or posterior surface of the glenohumeral joint. | Along the lateral trunk, parallel to the spine. | Parallel to the longitudinal axis of the humerus. | 0-180°
184° – American Academy of Orthopedic Surgeons 180° – American Medical Association 184° – Boone and Azen |
 |
| Shoulder Horizontal Abduction | On the top of the acromion process. | Placed on the superior aspect, parallel to the longitudinal axis of the humerus. The stationary arm stays in this position even though the longitudinal axis of the humerus moves. | Placed on the superior aspect, parallel to the longitudinal axis of the humerus. | 0-45° | Demonstration of goniometer measurement of horizontal abduction and adduction.
|
| Shoulder Horizontal Adduction | On the top of the acromion process. | Placed on the superior aspect, parallel to the longitudinal axis of the humerus. The stationary arm stays in this position even though the longitudinal axis of the humerus moves. | Placed on the superior aspect, parallel to the longitudinal axis of the humerus. | 0-135° | 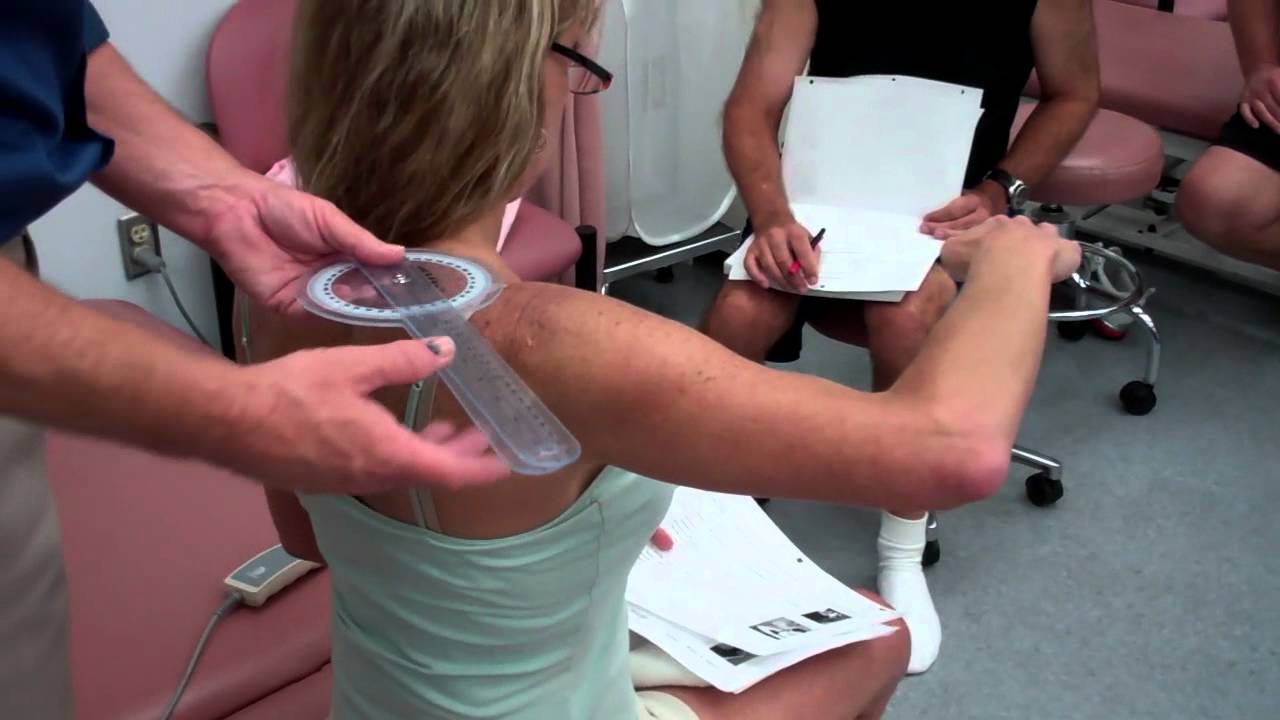 |
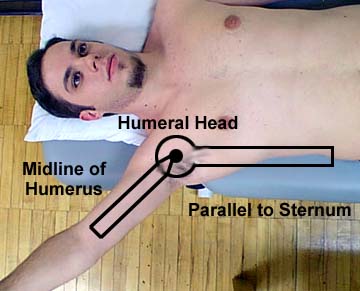
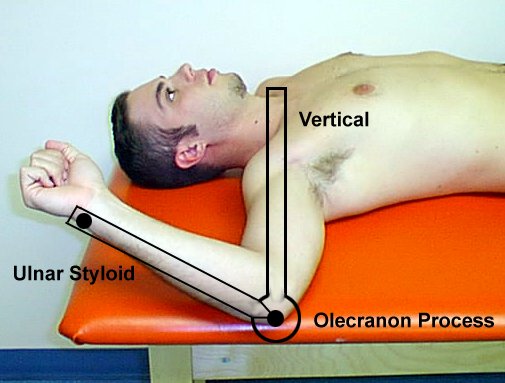
| Internal Rotation | On the olecranon process of the ulna with the arm positioned in 90° shoulder abduction and 90° elbow flexion. | Perpendicular to the floor and parallel to the lateral trunk. | Parallel to the longitudinal axis of the ulna. | 0-90°
69° – American Academy of Orthopedic Surgeons 90° – American Medical Association 68.8° – Boone and Azen |
Demonstration of goniometer measurements of internal and external rotation of the shoulder.
|
| External Rotation | On the olecranon process of the ulna with the arm positioned in 90° shoulder abduction and 90° elbow flexion. | Perpendicular to the floor and parallel to the lateral trunk. | Parallel to the longitudinal axis of the ulna. | 0-100°
104° – American Academy of Orthopedic Surgeons 90° – American Medical Association 103° – Boone and Azen |
 |
| Internal Rotation, Alternate Position | On the olecranon process of the ulna with the arm positioned in shoulder adduction and 90° elbow flexion. | Perpendicular to the floor and parallel to the lateral trunk. | Parallel to the longitudinal axis of the ulna. | 0-80°
|
Demonstration of goniometer measurement of internal and external rotation, alternate position. |
| External Rotation, Alternate Position | On the olecranon process of the ulna with the arm positioned in shoulder adduction and 90° elbow flexion. | Perpendicular to the floor and parallel to the lateral trunk. | Parallel to the longitudinal axis of the ulna. | 0-60° | |
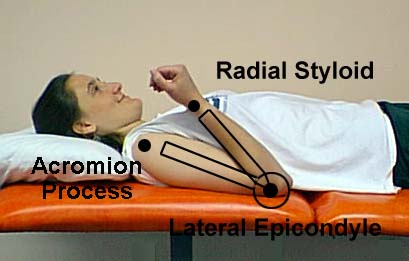
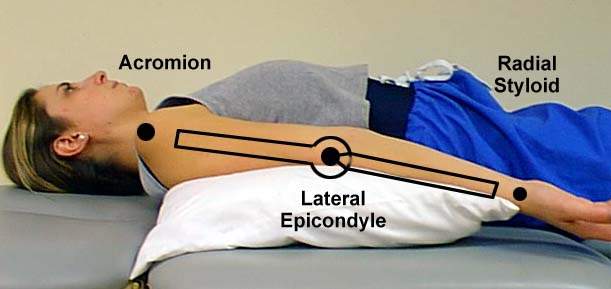
| Elbow Flexion/Extension | Lateral epicondyle of the humerus. | Parallel to the lateral surface of the longitudinal axis of the humerus. | Parallel to the longitudinal axis of the radius. | 0-150°
Flexion: 141° – American Academy of Orthopedic Surgeons 140° – American Medical Association 142.9° – Boone and Azen Extension: 0.3° – American Academy of Orthopedic Surgeons 0.0° – American Medical Association 0.6° – Boone and Azen |
Demonstration of goniometer measurements of elbow flexion and extension.
|
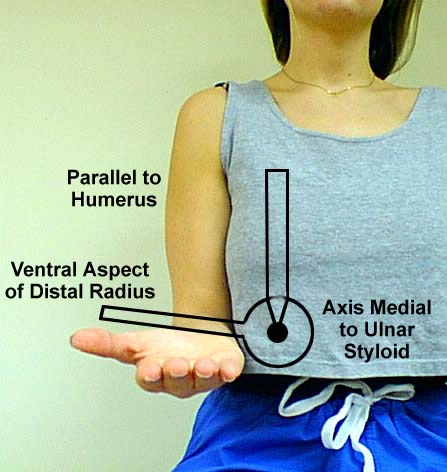
| Supination | Parallel to the longitudinal axis of the forearm, displaced toward the ulna. Arm positioned with the shoulder adducted, elbow flexed to 90°, forearm in mid position. | Perpendicular to the floor. | Across the volar surface of the distal radius and ulna. | 0-80°
81° – American Academy of Orthopedic Surgeons 80° – American Medical Association 82.1°- Boone and Azen |
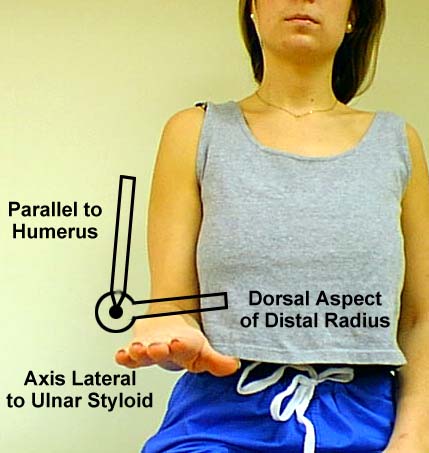
Demonstration of goniometer measurement of pronation and supination.
|
| Pronation | Parallel to the longitudinal axis of the forearm, displaced toward the ulna. Arm positioned with the shoulder adducted, elbow flexed to 90°, forearm in mid position. | Perpendicular to the floor. | Across the dorsal surface of the distal radius and ulna. | 0-80°
75° – American Academy of Orthopedic Surgeons 80° – American Medical Association 75.8° – Boone and Azen |
 |
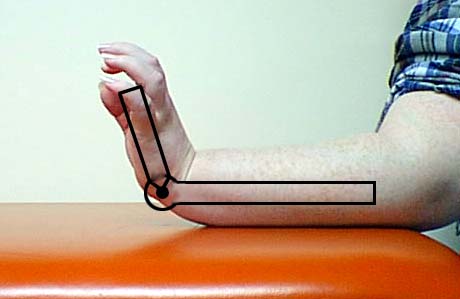
| Wrist Flexion | Over the styloid process of the radius with the forearm resting on a table with the forearm in mid position and the wrist in neutral. | Parallel to the longitudinal axis of the radius. | Parallel to the longitudinal axis of the second metacarpal. | 0-80°
75° – American Academy of Orthopedic Surgeons 60° – American Medical Association 76.4° – Boone and Azen |
Demonstration of goniometer measurements for wrist flexion and extension.
|
| Wrist Extension | Over the styloid process of the radius with the forearm resting on a table with the forearm in mid position and the wrist in neutral. | Parallel to the longitudinal axis of the radius. | Parallel to the longitudinal axis of the second metacarpal. | 0-70°
74° – American Academy of Orthopedic Surgeons 60° – American Medical Association 74.9° – Boone and Azen |
 |
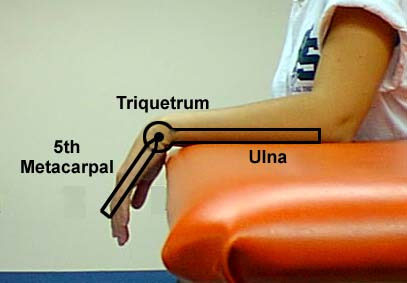
| Wrist Ulnar Deviation | On the dorsal aspect of the wrist in line with the base of the third metacarpal, with the forearm pronated and the volar surface of the forearm and hand resting on a table. | On the dorsal surface of the forearm along the midline. | Along the midline of the third metacarpal. | 0-30°
35° – American Academy of Orthopedic Surgeons 30° – American Medical Association 36.0° – Boone and Azen |
Demonstration of goniometer measurement of radial and ulnar deviation.
|
| Wrist Radial Deviation | On the dorsal aspect of the wrist in line with the base of the third metacarpal, with the forearm pronated and the volar surface of the forearm and hand resting on a table. | On the dorsal surface of the forearm along the midline. | Along the midline of the third metacarpal. | 0-20°
21° American Academy of Orthopedic Surgeons 20° American Medical Association 21.5° Boone and Azen |
 |
| Thumb CM Flexion | On the radial side of the wrist at the junction of the base of the first metacarpal and the radius. | Parallel to the longitudinal axis of the radius. | Parallel to the longitudinal axis of the first metacarpal. | 0-15°
|
Demonstration of goniometer measurement of thumb CM flexion and extension.
|
| Thumb CM Extension | On the dorsal side of the wrist at the junction of the base of the first metacarpal and the radius. | Parallel to the longitudinal axis of the second metacarpal. | Parallel to the longitudinal axis of the first metacarpal. | 0-20° | 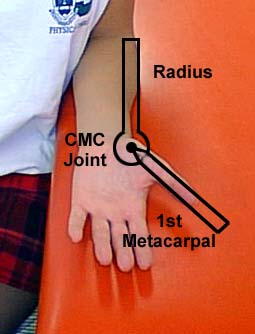 |
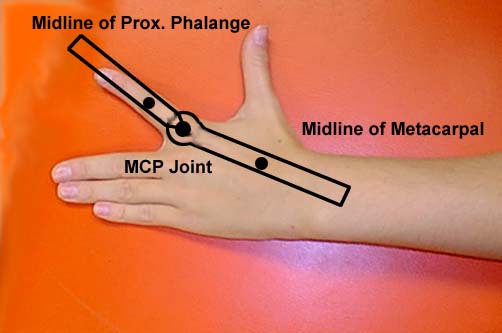
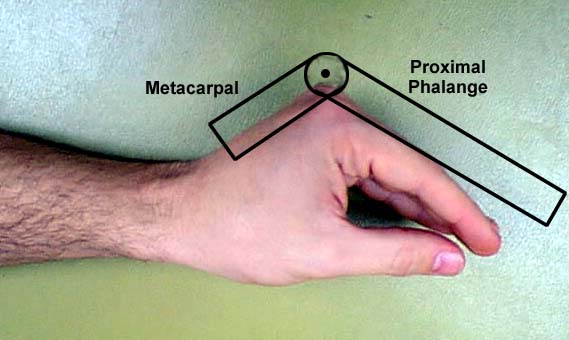
| Thumb MP Flexion/Extension | On the dorsal surface of the MP joint. | On the dorsal surface, parallel to the midline of the first metacarpal.On the dorsal surface, parallel to the midline of the first metacarpal. | On the dorsal surface, parallel to the midline of the proximal phalanx of the thumb. | 0-50° | Demonstration of goniometer measurement of thumb MP and IP flexion and extension.
|
| Thumb IP Flexion/Extension | On the dorsal surface of the IP joint. | On the dorsal surface, parallel to the midline of the proximal phalanx of the thumb. | On the dorsal surface, parallel to the midline of the distal phalanx of the thumb. | 0-80° | |
| Thumb Abduction | On the radial side of the wrist at the junction of the bases of the first and second metacarpals. | Along the lateral surface of the second metacarpal. | Along the dorsal surface of the first metacarpal. | 0-70° | Demonstration of goniometer measurement of thumb abduction.
|
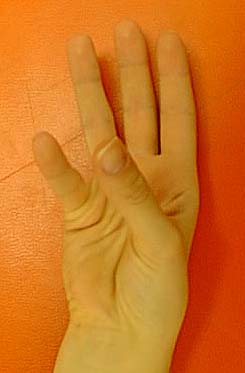
| Thumb Opposition | NA – ruler measurement from the tip of the thumb to the tip of the little finger. Only measured if there is a deficit. | Demonstration of the measurement of thumb opposition.
|
|||
| Index MP Flexion | On the dorsal surface of the MP joint of the index finger. | On the dorsal surface, along the midline of the second metacarpal. | On the dorsal surface, along the midline of the proximal phalanx of the index finger. | 0-90° | Demonstration of goniometer measurement of MP, PIP and DIP joints.
|
| Index MP Hyperextension | On the volar surface of the MP joint of the index finger. | On the volar surface, along the midline of the second metacarpal. | On the volar surface, along the midline of the proximal phalanx of the index finger. | 0-45° | |
| Index PIP Flexion/Extension | On the dorsal surface of the PIP joint of the index finger. | On the dorsal surface, along the midline of the proximal phalanx of the index finger. | On the dorsal surface, along the midline of the middle phalanx of the index finger. | 0-100° | |
| Index DIP Flexion/Extension | On the dorsal surface of the DIP joint of the index finger. | On the dorsal surface, along the midline of the middle phalanx of the index finger. | On the dorsal surface, along the midline of the distal phalanx of the index finger. | 0-90° | |
| Index Abduction | On the dorsal surface of the MP joint of the index finger. | On the dorsal surface, along the midline of the second metacarpal. | On the dorsal surface, along the midline of the proximal phalanx of the index finger. | No norm | Demonstration of goniometer measurement of finger abduction and adduction. |
| Index Adduction | On the dorsal surface of the MP joint of the index finger. | On the dorsal surface, along the midline of the second metacarpal. | On the dorsal surface, along the midline of the proximal phalanx of the index finger. | No norm | Demonstration of goniometer measurement of finger abduction and adduction, continued. |
| Middle MP Flexion | On the dorsal surface of the MP joint of the middle finger. | On the dorsal surface, along the midline of the third metacarpal. | On the dorsal surface, along the midline of the proximal phalanx of the middle finger. | 0-90° | |
| Middle MP Hyperextension | On the volar surface of the MP joint of the middle finger. | On the volar surface, along the midline of the third metacarpal. | On the volar surface, along the midline of the proximal phalanx of the middle finger. | 0-45° | |
| Middle PIP Flexion/Extension | On the dorsal surface of the PIP joint of the middle finger. | On the dorsal surface, along the midline of the proximal phalanx of the middle finger. | On the dorsal surface, along the midline of the middle phalanx of the middle finger. | 0-100° | |
| Middle DIP Flexion/Extension | On the dorsal surface of the DIP joint of the middle finger. | On the dorsal surface, along the midline of the middle phalanx of the middle finger. | On the dorsal surface, along the midline of the distal phalanx of the middle finger. | 0-90° | |
| Middle Abduction (radially) | On the dorsal surface of the MP joint of the middle finger. | On the dorsal surface, along the midline of the third metacarpal. | On the dorsal surface, along the midline of the proximal phalanx of the middle finger. | No norm | |
| Middle Adduction (ulnarly) | On the dorsal surface of the MP joint of the middle finger. | On the dorsal surface, along the midline of the third metacarpal. | On the dorsal surface, along the midline of the proximal phalanx of the middle finger. | No norm | |
| Ring MP Flexion | On the dorsal surface of the MP joint of the ring finger. | On the dorsal surface, along the midline of the fourth metacarpal. | On the dorsal surface, along the midline of the proximal phalanx of the ring finger. | 0-90° | |
| Ring MP Hyperextension | On the volar surface of the MP joint of the ring finger. | On the volar surface, along the midline of the fourth metacarpal. | On the volar surface, along the midline of the proximal phalanx of the ring finger. | 0-45° | |
| Ring PIP Flexion/Extension | On the dorsal surface of the PIP joint of the ring finger. | On the dorsal surface, along the midline of the proximal phalanx of the ring finger. | On the dorsal surface, along the midline of the middle phalanx of the ring finger. | 0-100° | |
| Ring DIP Flexion/Extension | On the dorsal surface of the DIP joint of the ring finger. | On the dorsal surface, along the midline of the middle phalanx of the ring finger. | On the dorsal surface, along the midline of the distal phalanx of the ring finger. | 0-90° | |
| Ring Abduction | On the dorsal surface of the MP joint of the ring finger. | On the dorsal surface, along the midline of the fourth metacarpal. | On the dorsal surface, along the midline of the proximal phalanx of the ring finger. | No norm | |
| Ring Adduction | On the dorsal surface of the MP joint of the ring finger. | On the dorsal surface, along the midline of the fourth metacarpal. | On the dorsal surface, along the midline of the proximal phalanx of the ring finger. | No norm | |
| Little MP Flexion | On the dorsal surface of the MP joint of the little finger. | On the dorsal surface, along the midline of the fifth metacarpal. | On the dorsal surface, along the midline of the proximal phalanx of the little finger. | 0-90° | |
| Little MP Hyperextension | On the volar surface of the MP joint of the little finger. | On the volar surface, along the midline of the fifth metacarpal. | On the volar surface, along the midline of the proximal phalanx of the little finger. | 0-45° | |
| Little PIP Flexion/Extension | On the dorsal surface of the PIP joint of the little finger. | On the dorsal surface, along the midline of the proximal phalanx of the little finger. | On the dorsal surface, along the midline of the middle phalanx of the little finger. | 0-100° | |
| Little DIP Flexion/Extension | On the dorsal surface of the DIP joint of the little finger. | On the dorsal surface, along the midline of the middle phalanx of the little finger. | On the dorsal surface, along the midline of the distal phalanx of the little finger. | 0-90° | |
| Little Abduction | On the dorsal surface of the MP joint of the little finger. | On the dorsal surface, along the midline of the fifth metacarpal. | On the dorsal surface, along the midline of the proximal phalanx of the little finger. | No norm | |
| Little Adduction | On the dorsal surface of the MP joint of the little finger. | On the dorsal surface, along the midline of the fifth metacarpal. | On the dorsal surface, along the midline of the proximal phalanx of the little finger. | No norm |
Total active motion (TAM) is described by the American Society for Surgery of the Hand as the sum of active MCP, PIP and DIP arc of motion in degrees of an individual digit. This calculation can then be compared to the TAM of the contralateral hand.
How to calculate TAM
1. Evaluate the patient’s flexion and extension of their MP, PIP, and DIP joints of each finger. Measure the values for each joint separately with a goniometer.
2. Calculate the TAM by subtracting the total active flexion of the MP, PIP, and DIP joints from the total extension deficit of the same joints.
3. Repeat the same steps on the corresponding joints of the contralateral hand.
4 Calculate TAM% by dividing the TAM of the injured finger by the TAM of the contralateral finger.

Definition of Positive Result
A positive result occurs when the patient displays a TAM% that is fair or poor in at least one of the digits evaluated.
Definition of Negative Result
A negative result occurs when the patient displays a TAM% that is good or excellent in every digit evaluated i.e. the patient has a normal range of motion in all joints.

A contracture is a limitation in active or passive range of motion that is caused by structural changes in the muscles, ligaments and/or tendons surrounding the involved joint. The primary cause of a contracture is loss of active motion due to another condition. Here is a partial list of conditions that can cause loss of active motion in all or portions of the upper extremities, leading to the possibility of contracture development:
-CVA with hemiparesis
-Traumatic brain injury
-Other chronic or progressive neurological conditions, such as multiple sclerosis, muscular dystrophy, amyotrophic lateral sclerosis, etc.
-Alzheimer’s disease
-Seizure disorder
-Cerebral palsy
-Nerve lacerations
-Brachial plexus injuries
-Crush injuries
-Tendon and ligament injuries that do not receive timely or proper management
-Dupuytren’s contracture
-Burns
The development of contractures leads to permanent loss of function, problems with hygiene and skin integrity, pain, and difficulty with ADLs. Splinting is often used to help reduce contractures. Please see the worksheet on splinting for these techniques. The treatment techniques listed below also help to prevent contracture development and progression. Once an effective contracture management program is developed for a patient, the occupational therapist should educate caregivers on the techniques required to continue the program daily.
| Technique | Description | Example | Photo/Video |
| Passive stretching | The therapist moves the joint with no assistance from the patient. The joint is moved until slight resistance is palpated and then the position is held for several seconds before returning the joint to the starting position. The patient may experience some mild discomfort at the end range during passive stretching if the joint is tight, but should not experience significant pain. | An occupational therapist provides passive range of motion stretches to a patient who has left upper extremity hemiparesis resulting from a CVA. | A physical therapy student demonstrates passive range of motion exercises. |
| Active Range of Motion Exercises/Activities | The patient actively moves the joint without assistance from the therapist. The patient may move the joint independently, or may move the joint during functional activities.
-Tendon Gliding – specific AROM exercises that ensure adequate movement of the various tendons of the hand within the structures of the hand. |
A patient reaches for cones placed on a shelf to improve active shoulder flexion. | Demonstration of occupational therapy activities that incorporate upper extremity active range of motion.
A hand therapist demonstrates tendon gliding exercises for patients to do at home. |
| Active Assistive Range of Motion Exercises | The patient actively participates in range of motion exercises with partial assistance from the therapist or with adaptations to the exercise set-up to eliminate gravity during the exercises. Active assistive range of motion exercises are completed when the patient has too much upper extremity weakness to allow for full active range of motion. | A patient pushes a towel forward and back on a table top with both hands to improve shoulder flexion. | A woman demonstrates active assistive range of motion exercises, using her stronger hand to help her weaker hand. |
| Joint mobilization | The therapist manually manipulates a joint to loosen the ligaments holding the joint together to improve range of motion. The joint is stabilized on both sides. The joint is distracted by pulling the distal side away from the proximal side, then a small, gentle force is applied repeatedly in the direction of the desired range. Joint mobilization is followed by passive stretching or active range of motion exercises. | An occupational therapist applies joint mobilization techniques to a patient’s index MP joint to improve index finger flexion. She follows joint mobilization with active finger range of motion exercises. | Demonstration of joint mobilization to the MP and IP joints. |
Address : 11777 San Vicente Blvd, Los Angeles, CA 90049 suite # 502
At the end of each month, Pass the OT awards $250 to one lucky user who fills out our brief exit survey.
This survey will be sent to you after you have taken the exam.
We look forward to helping you pass the near future
Begin ProgramPlease upgrade your package to view this quiz
UpgradePlease upgrade your package to view this quiz
UpgradePlease upgrade your package to view full page content
UpgradePlease upgrade your package to view full page content
UpgradeWhat is included
What is not included
What is included
What is not included