


Select an icon below for a tailored-to-you guide to ColorMade!
 New to Presets |
 Familiar with Presets |
 Shoot & Edit on Mobile |
This guide is ideal for casual photographers or photographers who are new to presets.
Other available guides:
- Old Pro, New Tricks (Professional photographers seeking new editing tools)
- Mobile & Social (On-the-go mobile shooters & editors with social media in mind)
Why Edit my Photos?
What are Lightroom Presets?
Why use Lightroom Presets?
What Software do I Need?
How to Edit an Image with Lightroom Presets
Best Collections for Those New to Lightroom Presets
How to Install Presets into Lightroom Software
Access 1:1 Support
Whether you’re a casual photographer or a budding learner, it’s normal to feel overwhelmed by crafting the perfect photo edit or even dialing in to editing trends. You may perceive presets as professional-only tools or you may not be aware that presets are different than the photo filters you’d find in Instagram, Snapseed, VSCO, or your latest phone camera update. We’ve all been new at some point – we understand and we’re here to help! In this guide, we breakdown primary concepts and foundational tools to give you more control over your edits and your outcomes. Let’s get started!
Why Edit my Photos?
Think of digital image processing in Lightroom like the chemical processing within a film photographer’s dark room; It’s where the magic happens! Lightroom doesn’t change the quality of your image nor does it simply dress it up in a costume, but instead develops your image into an outcome that matches your vision.
Whether using a high-quality digital camera or a mobile phone, both RAW images (all image data is recorded and unfiltered by your camera sensor) andJPEGs (automatically compressed and color processed by your camera), can look washed out, lackluster, or not color accurate. So even your vision is a natural and clean true-to-life photo edit, you may not find this in-camera. Photographers edit photos both to develop their vision and to accurately reflect what can be seen with the human eye. The tool they most often use to accomplish this? Lightroom presets.
Whether you desire true-to-life tones or something more artsy and stylistic, Lightroom presets offer a quick and easy solution to achieving a professional edit in little time. At The Luxe Lens, we offer professional-grade Lightroom presets and post-processing workflows. Our products are crafted by pro photographers and editors. They allow anyone the ability to quickly tackle well-tested professional level edits in seconds, while also providing the flexibility to define or refine individual style in the process.
What are Lightroom Presets?
Lightroom presets are quick and convenient editing tools that apply specific develop settings to images within Adobe Lightroom and Photoshop’s Adobe Camera Raw Plug-in (ACR) for a full photo edit. These presets can be built to act as quick tools that only affect a single setting within Lightroom or they can be built to affect multiple settings at once, giving you a final look with the single click of a button. When people talk about presets, they’re typically referring to general presets. General presets change dozens of settings with one button click.
General Presets – General presets make global changes to an image. They cannot be stacked and should be applied alone or before using a tool preset.
Tool Presets– Tool presets also create global changes within an image, but they only change a single aspect of the image such as toning or exposure. Tool presets typically adjust a single setting (or group of similar settings) but keep all other previous changes constant. Tool presets are also known as post add presets. Tool presets can be stacked after applying a general preset.
AI Tool Presets – AI Adaptive presets create localized changes via Adobe Sensei Artificial Intelligence. These presets work from the same location as the general workflow and tool presets and are adjustable with the amount slider. They work by detecting and masking for specific zones to apply our specialized settings only to that zone. (Example: The Skin Fix AI presets in our single palette collections apply color correction only to face & body skin, allowing you to maintain bold stylistic color edits for your images without sacrificing skin tones!)
Why Use Lightroom Presets?
Easy to use – Once installed, a full photo edit or a quick photo adjustment is just a click away.
Save time – Our full editing workflows can be accomplished in seconds.
Consistency – With presets, there is no need to remember which settings you changed to get your perfect edit, because your perfect edit is just a click away.
Inspirational – Easily try on different looks with side-by-side comparisons
Doesn’t require specialized training in LR – Presets help you to acclimate to photo-editing in Lightroom without diving into the deep-end, so that you can spend more time creating, as you learn.
What Software Do I Need?
Why Adobe?
Adobe’s Lightroom is the gold standard for photo-processing, leading the industry in providing a user-friendly interface for accessible and professional post-processing workflows across desktop and mobile.
How do I get Lightroom?
For desktop editing, you will need an Adobe subscription to Lightroom, Photoshop, or both. We recommendAdobe’s Photography Plan which includes Lightroom (cloud-based, syncs to mobile), Lightroom Classic (full version of Lightroom, support local adjustment brushes), and Photoshop. For mobile shooters and editors, the Lightroom mobile app is totally free (with a premium version at only $4.99/month). Please note, we do not sell Adobe software – this is simply our best recommendation.
What’s the difference between Lightroom, Lightroom Classic, Photoshop ACR, and Lightroom Mobile?
When it comes to Lightroom, it can be easy to confuse the different iterations on naming alone, and hard to determine which one you need. Especially considering that Lightroom Classic was referred to as “Lightroom CC 2015” at one point and then “Lightroom Classic CC”, and the current cloud-based Lightroom was also originally referred to as “Lightroom CC”. Then when you realize that presets can be used in Photoshop as well (through the Adobe Camera Raw plug-in), it becomes even more important to understand the difference between these RAW photo processors.
Lightroom (CC) |
Originally referred to as “Lightroom CC”, the modern subscription-only cloud-based Lightroom for desktop is now referred to as simply “Lightroom” within Adobe’s creative cloud suite. Cloud is key here, as this version was built for seamless cloud workflows (desktop-to-desktop, desktop-to-mobile, peer-to-peer, program-to-program). This desktop version of Lightroom mirrors the mobile iteration of the processor and allows for sync of photos, edits, and even presets between desktop and mobile. While still a powerful iteration of Lightroom, key features like Local Adjustment Brush import are missing and you will need to pay for more storage if your limit is exceeded. Intuitive and streamlined with ai-tagging, intelligent search, and automatic file backup to the Adobe Cloud, it’s a real winner |
|
Lightroom Classic |
Lightroom Classic is the comprehensive version of Lightroom often considered the “Full” version of Lightroom, as it represents the classic or original build of Lightroom. This version of Lightroom was available for outright purchase and called “Adobe Photoshop Lightroom” (Other iterations include Lightroom 5, 6, and Lightroom CC 2015), but is now available only with a creative cloud subscription. This well-loved version is best for those that wish to clearly delineate between their library and their photo editing workspace. This Lightroom software version provides a desktop workspace that presents all tools in a single space without the need to toggle between windows. As of 2023, this version continues to boast more features than its mobile predecessor, but in coming years, we expect Lightroom (CC) to surpass Lightroom Classic in functionality and usability. |
|
 |
Photoshop ACR |
This raw photo processor functions as a Photoshop plug-in and is considered the engine behind what we now know as Lightroom. Adobe Camera Raw (ACR) launches whenever a RAW photo is opened in Lightroom, and can edit any image (JPGs, etc.) within Photoshop via Filter… > Adobe Camera Raw Filter… The current user interface pretty closely mirrors the latest cloud-based Lightroom, though more classical in appearance. |
Lightroom Mobile |
Lightroom mobile is a relatively new powerhouse for mobile editing, mirroring the cloud-based desktop iteration of Lightroom, and allowing for detailed global and local editing workflows that sync between desktop and mobile for desktop subscribers. Free mobile users, while restricted from accessing certain premium features, still have the option to utilize presets and many powerful develop settings for professional editing on the go. |
How to edit an image with Lightroom presets
Edit with me! Let’s walk through a ColorMade Workflow in Lightroom. For this I’ll be using the Warm Petals Single Palette Collection because the intuitive top-down workflow is amazing for learners, and facilitates quick correction of exposure, white balance, and any lens-related issues. (Make sure to note the changes the presets make on the right side of your screen, within develop settings as you apply presets in your own workflow.)
Here you'll watch a step-by-step example workflow utilizing each part of this collection on a stunning image by @baylieranaephoto:
The first step in our workflow involved bringing up our Exposure (the amount of light in your image) to illuminate our subjects more evenly, while retaining the shadowy intimacy of the original shot. Here I used our “Exposure Increase” workflow tool to subtly boost exposure +0.35. When exposure is adjusted with this preset, it can be adjusted directly from the preset panel with the "Amount slider" to keep everything on the left-hand side for a quick workflow. While you may not want to adjust exposure for every image, or even need to, it’s important to note that you wouldn’t want Exposure changes built into a general or full-edit preset, as the amount of light in your images will vary greatly on an image-to-image basis. For example, you wouldn’t want exposure increased on a very bright, or even well-balanced image, and you certainly wouldn’t want it decreased on an already dark one.
Consider White Balance
While this example had pretty clean white tones without any particularly yellow, blue, green, or magenta hue, the WB tool we used very subtly pulled things cooler and bumped them a touch more magenta per the atmosphere.
There are 3 ways you can correct white balance in your image.
Proper white balance ensures that the whites or neutral colors in the images are clean and true-to-life. Automating white balance or dropping that eye dropper on a truly neutral color will remove color casts (typically yellow or blue) to get true whites that take toning beautifully, as designed. While you may think that a little yellow isn’t bad for a bronze or golden light edit, it can make a world of difference in how your image takes toning. It will also help to avoid orangey or unnatural skin tones.
Experiment with Presets & Tools
With any new collection of presets, you'll want to spend time getting to know how the collection is organized, what is included, and what each individual preset looks like on your unique images. We offer many full collection and brand-specific guides and workflows on our help center HERE. In Lightroom, the option to hover over presets to preview them prior to application makes this sort of experimenting and getting a feel for what you like super easy!
Lightroom Classic specific Local Adjustment brushes function via the brush or Masking feature in Lightroom Classic, and require you to create a mask or manually brush on the preset effects to localized (specific) part of your image. We offer tons of free education about local adjustment presets and masking on our Luxe Blog.
AI Adaptive or AI Effects Presets rely on the latest Adobe Sensei AI functionality in the latest subscription versions of Lightroom, Lightroom Classic, Lightroom Mobile*, and Photoshop. While these apply in one click from the left-hand preset panel just like general presets and tools, they apply changes locally via Masks and require time to compute and mask our settings to your unique image(s). Learn more about how these work and how to adjust them HERE.
Best Collections for those new to presets
The ColorMade Single palette collections, such as the Warm Petals collection we walked though in the How to Edit section involve workflow tools organized into three sections: White Balance & Exposure, Presets, and Tools which can be extremely helpful for beginners orienting themselves to Lightroom and the possibilities for their images!
Some beginners, and those new to presets, prefer less tools and more stylistic variety, as they are still dialing in a signature look & feel for their edits. So for these users, we typically recommend our Signature or DigiFilm Preset collections. These collections tend to offer a greater variety of options while remaining thematic. For example: our DigiFilm Sand & Stone collection offers a versatile range of earth-inspired edits for portraits with both clean and filmic-matte options for each one. Our Sweater Weather 2.0 collection offers 40 global workflow preset options that are specially tailored to modern warm autumnal toning.
How to install presets into Lightroom software – desktop and mobile
Our Installation Help Center was specially crafted to walk you through download, installation, use and troubleshooting!
Access 1:1 support
Customer support
Do you have additional questions? Need custom recommendations and workflow tips? Having some trouble with installation or use of your ColorMade products? We’re here to help! Simply shoot us an email at support@theluxelens.com
This guide is ideal for professional or seasoned photographers
Other available guides:
Why Use Presets?
How to Use and Customize presets
How to Install Presets into Lightroom Software
Access 1:1 Support
Why Use Presets?
Workflow speed – As your workload increases, expediting your workflow, without needing to outsource, gains higher priority. Improving workflow speed while maintaining quality saves both time and money.
Compatible with batch editing and auto-import with preset – In Lightroom, you can import entire groups of images to specific folders with a preset applied at import. You can also sync develop settings across entire image collections. This results in a personalized and effective workflow that frees your time to focus on detail retouching.
Inspiration with visual comparisons – With scroll-over preview of presets, you can find inspiration through real-time image comparisons. It’s like an interactive dressing room for your images! Consider multiple options before settling on the perfect edit. Tip: Use the digital copies feature to see more than two side-by-side edits.
Consistency – Our presets have been extensively tested across multiple camera profiles, subjects, skin tones, and lighting environments to ensure tonal consistency.
Recreate the look of film while shooting digital – Our film-inspired presets allow you to bring nostalgic film tones, crushed blacks, and dreamy highlights to your digital images at the touch of a button, for a timeless, lived-in edit.
Completely customizable – Our presets and toolkits support creativity and customization. Adjust and resave to create edits uniquely your own.
How to Use and Customize Presets for a Unique Look
Edit with me! Let’s walk through a ColorMade Workflow in Lightroom. For this example, I’ll be using the Warm Petals single palette collection because the built-in workflow tools are really helpful for quickly setting exposure and white balance. I’ll also discuss how to batch edit and import whole sets with a preset applied at import. We’ll be working through some stunning outdoor wedding shots by Alex Gabriel.

This image is beautifully composed and looks just phenomenal straight off the camera. However, note that the image leans underexposed (in order to capture all of the surrounding details) and a touch cool on the skin. So before we add any presets, we’ll want to address these factors. This will provide a well-balanced canvas for our preset application.

Here I used the “Exposure +” tool to get a soft little boost across the image (+.35). This brings everything up without obscuring or washing out any of the gorgeous surrounding details.

Here I used the “Auto” tool to quickly balance the whites and to reintroduce some of the rich golden undertones across the subject’s skin tone and native to the surrounding environment. This also corrects the soft blue/lavender cast we were seeing on the flowers.
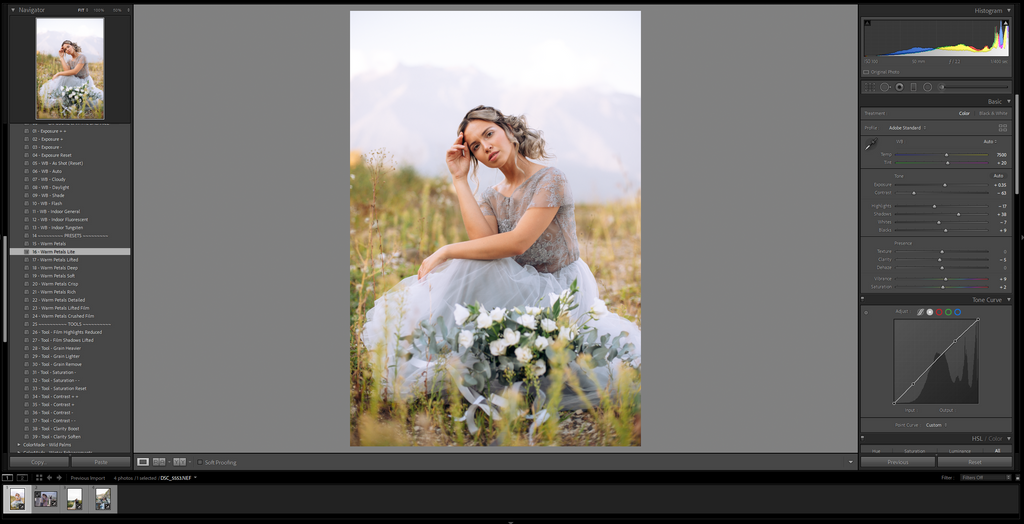
This image doesn’t need a heavy-handed edit to really pop. So, I selected the “Warm Petals Lite” preset. This selection honors the floral palette of the image and layers in a stylistic, filmic atmosphere. This serves to lift our subject and to distinguish the surrounding elements without pushing clarity, contrast, or leaning too hard into a stylistic edit. Note: Editing is entirely subjective, and something sharper or more stylistic would certainly work for this image. In crafting our collections, we believe a variety of options (even for single palette offerings) is vital for individualized and creative workflows.


The Warm Petals collection is analog-inspired and so it also adds a stylistic film grain. This addition results in a felt image texture, especially in the shadows. This is a great choice for when timeless filmic elegance is the goal. However, I chose to remove this grain with the “Tool – Grain Remove” preset to honor the soft contrast of the image. I also wanted minor details emphasized - particularly the subject’s features. The difference is very minimal, and completely subjective, but is just another step in achieving my ideal edit.
Local adjustments are another subjective and optional part of any workflow. These can be brushed on, or applied as a horizontal or radial gradient. Local adjustment presets are extremely powerful when targeting specific, localized issues like discoloration, harsh shadows or highlights on subjects, and obscured text or object details. They’re also commonly used to bring back a sky or environment that may have disappeared (most often in the highlights) after applying subject-focused toning.

Here I have used the “CM DigiFilm Lumena – Shadows Darken” local adjustment preset to gently brush back in some of the lost background details like the mountain landscape.
You may find that you have a specific need for a set of images that a specific preset doesn’t fully address.
For example, you may find yourself always adjusting the grain, highlights, or shadows (with quick tools or manually) after applying a favorite general preset. In this case, we recommend saving a variation that includes those changes for quick processing in the future. Here I saved my grain-removed Warm Petals Lite preset:

Tip: Don’t save over white balance, exposure, local adjustments, or lens corrections here. These are all things you’ll want to address on an image-to-image basis.
This feature also works with adjustment presets (brushes). To accomplish this, you can either “Update your saved preset” (if you’ll never use the original preset and will remember which changes you made), or you can “Save as New Preset…” named to account for the specific changes you made:


Here, I pulled down the highlights as well, so I could really enjoy the peaks of those mountains. In this case, I wouldn’t want to save over “Shadows Darken”, but rather create a new preset and name it “Shadows Darken, Crush Highlights” for later.
Even if I was heavy handed in this case, and it may not perfectly suit a later project, the best part of local adjustments is the ability to manipulate the strength of their effect, by simply clicking on the little arrow to the far right of the selected effect:

Now that I know the general vibe/style I am liking for these outdoor shots, I can go ahead and apply my edit to a batch of images. This will apply the same edits across multiple images. Of course, we will still manually evaluate exposure, white balance, and local re-touching, because these are image specific. But batch editing is a HUGE timesaver that results in consistency and that saves both money and time.
To begin, select all of the images in your set from your bottom filmstrip, then select “Sync…” from the bottom of your develop settings panel, located on the right-hand side. Remember to avoid syncing exposure, white balance, local adjustments, crop, and any other situation specific adjustment, unless in special cases or when editing EXTREMELY similar images within the same environment:

Here’s what this sync looks like on another photo in the set:

Super happy with these results! Be sure to experiment with sync across your photo sets to learn what best works for you!
In this example, we’ll batch import a collection of images from the talented Claudia Crispi. For reference, these are .NEF Nikon RAW files, and we’re importing them with the “Peaceful Evening” preset from our ColorMade “Earth & Sky” collection applied.
To begin, we’ll navigate to “Import” from our Library module, and then with our images selected for import, we’ll look to “Apply During Import” on the right-hand side to select our desired preset under the “Develop Settings” option:


Once your desired preset is selected, simply hit import. Once in Develop mode, you’ll see the selected edit applied to your images. Now you can focus on minor and localized adjustments for a whip-quick workflow. Happy editing!
How to install presets into Lightroom software – desktop and mobile
Our Installation Help Center was specially crafted to walk you through download, installation, use and troubleshooting!
This guide is ideal for mobile photographers or Instagram users
Other available guides:
What are Instagram Presets?
Why Use Instagram Presets?
How to Purchase Lightroom Software or Get it for Free!
How to Use Instagram Presets for Lightroom
Best Collections for Instagram and Mobile Users
How to Install Lightroom Presets for Mobile Use
Access 1:1 Support
Many of us are familiar with mobile photo filters associated with specific apps. These filters provide basic overlays or stylistic changes at the touch of a button. Filters are nice. Presets are better. In fact, presets and actions are a gold-standard resource for professional photographers.
Lightroom presets manipulate raw image develop settings to professionally adjust light and color data for a clean edit that won’t damage your image or lower quality the way some photo filters can. Because they’re applied within a product designed by Adobe, specifically for photographers, a single Lightroom preset can change up to 60 different image settings at the click of a button. Presets are key branding resources for social media because they’re designed for consistency and accuracy. They’re designed for professional use. You may have noticed that filters look different on different images. Lightroom presets remain tonally consistent despite differences in environment across photo sets. Lightroom presets are the ideal editing tools for brands, influencers, bloggers, and content creators.
Our Instagram Presets were designed by seasoned professionals and informed by color theory. Our collections were designed to apply a quick single palette, or thematic full color edit to your images at the touch of a button.
Lightroom presets, and more specifically our Instagram Presets for Lightroom, work in the paid and free versions of the Lightroom mobile app. Lightroom allows you to apply your preset, copy your settings, sync those settings across all of your images, and quickly export your finished images directly to Instagram or to your Files/Camera Roll.
Easy way to improve post quality – In a sea of same, you want to stand out! One way to do this is with powerful, on-brand edits that pop. Stop viewers in their scroll, make them feel something, and encourage them to interact with powerful and professional image edits.
Consistent and cohesive feed – A single great edit may stop someone in their tracks and bring them to your feed, but a consistent and clear brand keeps them there. A consistent feed emotionally connects followers to both your brand and your vision.
Doesn’t require excessive training in photo editing software – You don’t need to be an editing expert or outsource this task to get a clean and beautiful feed.
Why Lightroom?
Adobe Lightroom’s mobile app is the most powerful and professional photo-editing resource on the market for mobile editing. With an intuitive and straightforward user interface, Lightroom is an easy-to-learn program featuring powerhouse develop settings for dialing in professional photo edits in seconds. You won’t be swamped down with ads or overwhelmed with flashy but unprofessional options. And you won’t have to worry about the quality of your photos being affected by the edit. In Lightroom, you’re in full control from import to export. Adobe Lightroom is the tool used by most bloggers, influencers, photographers, and content creators on Instagram.
Should I pay for a mobile subscription?
The FREE Lightroom mobile app
Lightroom’s mobile app is free for iOS, iPadOS and Android, and locked premium features do not affect mobile images or preset editing. You can still achieve stunning edits on JPG images with a click in the free app using presets or global develop adjustments. However, for free users, photos, edits, and presets are all wiped if you upgrade your device or uninstall the app.
Lightroom’s premium application is only $4.99/month and offers tons of cloud storage, local adjustment options for detailed photo-retouching, quick sync of edits via copy + paste settings across groups of images, and RAW photo editing. *If you have a desktop subscription for LR the paid version of Lightroom mobile is included and all photos, edits, and presets will automatically sync between desktop and mobile for effortless desktop-to-mobile workflows. This is ideal if you prefer the flexibility of editing both at your desk and on-the-fly!
Here are some quick compares of nine shots on iPhone, Android, Canon DSLR, and Nikon DSLR edited 100% in Lightroom mobile with our Instagram sets applied, so you can quickly visualize our cohesive feed transformations:

Shot on Android, and edited with our Clean & Cool collection in Lightroom mobile:


Stunning, earthy, and ready for export without any further adjustments!
Here, we’ll be looking at an iPhone shot in Lightroom mobile.
Correct - While not dark, the image is shadowy, so we’ll go ahead and softly boost exposure:


The share icon will appear as a box with an up arrow for iPhone/iPadOS, and three-point web for Google/Android

For Lightroom mobile on both iOS and Android, your Export options will include “Share to…” and “Export as…”:

“Share to…” will allow you to share directly to Instagram or other social media applications. For iOS, you also have the option to “Export to Camera Roll”, or “Export to Files”. For Android, you can simply “Save to Device”.
To copy settings in Edit mode, first access your options menu via a “…” menu (Arranged vertically on Android and horizontally on iOS), and from that menu, select “Copy Settings”, only uncheck boxes that would affect image-specific settings (if you have not changed optics, exposure, or white balance, do not uncheck any boxes) and click check to save those settings to your clipboard.


The settings sync workflow for Paid Users: Paid users can copy settings in Edit mode (on Android) or in your library or album (on iOS) and paste across an entire selection of photos with one click:
On iPhone, this appears as a “Copy” and “Paste” option across the bottom toolbar:


On Android, you can copy your settings from Edit mode, and then in “All Photos” or your specific album, you can select multiple images, navigate to the “…” menu and select “Paste Settings”.
If the lighting conditions vary across images you’ll want to view each photo individually to address quick exposure, white balance, or crop corrections prior to bulk export.
Once complete, simply select all and click on your share icon (this is on the bottom of the screen for iOS users and the top for Android users):

Best Collections for Instagram and Mobile Users
Our Help Center offers detailed installation guides for installing presets into Lightroom Mobile for iOS, iPadOS, Android, and Chromebook. We also offer a guide for desktop subscribers to sync to mobile from the cloud-based desktop application for seamless desktop-to-mobile workflows.
Our Installation Help Center was specially crafted to walk you through download, installation, use and troubleshooting!
Access 1:1 Support
Got questions? Need help finding the perfect edit for your brand? Having some trouble with installation or use of your ColorMade products? We’re here to help! Simply shoot us an email at support@theluxelens.com


