Stormworks: Build and Rescue

Stormworks: Build and Rescue

82 ratings
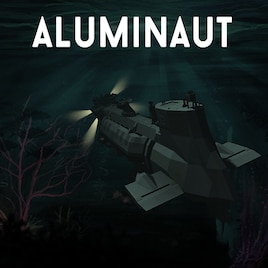
Reynolds Metals Aluminaut
   
Award
Favorite
Favorited
Unfavorite
File Size
Posted
Updated
1.460 MB
Dec 6, 2018 @ 7:12pm
Apr 18, 2023 @ 1:53pm
27 Change Notes ( view )

Subscribe to download
Reynolds Metals Aluminaut

Description
Built in 1964 by Reynolds Metals (same folks that make your aluminum foil) Aluminaut was the first all aluminum deep sea submersible ever build, and could dive to 15000 FT (4600M). She was most famous for assisting in the recovery of a nuclear weapon lost by the U.S. Air Force, as well as the recovery of another famous submersible 'Alvin' from the bottom of the ocean after its accidental sinking. After a very short career and retirement in 1970, Aluminaut was donated to the Science Museum Virginia https://www.smv.org and is on permanent display.

DIVING:
  1. Before heading down into the pressure hull refill the Port and Starboard Shot Ballast Hoppers located on the deck. (reference the pictures for their location). Pressing the hidden button(s) once will start the process of refilling the Shot Ballast Hoppers.
  2. Head down into the pressure hull and secure the hatch. Note: The sail is a free flood area.
  3. Turn on one or both of the Battery Isolators
  4. Close all the required Breakers
  5. Move to the 'Helm Operator's Seat'
  6. Verify the Barometric Pressure is 29.92, if not, turn on the Bilge Pump (reference the pictures for it's location)
  7. Turn on the Trim Pump
  8. Verify the Port and Starboard Ballast Tank switches are in the 'Vent'/Off position.
  9. 'Open'/Turn On the the Main Ballast Tank switch, both the Port and Starboard "Vent Open" lights should come on.
  10. Once the ballast tanks are full you can close the vents by 'Shutting'/Turning Off the Main Ballast Tank switch

CONTROLLING NEUTRAL BUOYANCY:
  1. When approaching the bottom you can begin dropping 'Shot Ballast' this is done by first turning the Port and Starboard Shot Ballast switches to "Operate"/On.
  2. Then Turn On the "Demagnetize Shot Ballast" switch.
  3. Drop as much shot ballast as is required to become neutrally buoyant. Roughly 1790 to 1800 lbs. should be remaining.
Notes to buoyancy control:
  • It is NOT advisable to use high pressure air for the purpose of controlling depth. The high pressure air system is slow to react and cannot be relied on to make small buoyancy changes.
  • Located on the pressure hull to the right of the 'Ballast Control Panel' is two arrow buttons that when pressed will stop the shot ballast from dropping at pre-selected points. This allows the Helmsman to focus on other operations. Although, if you wish you can control the shot ballast system yourself, by leaving the 'auto stop' arrow buttons off.

MANEUVERING:
  • Located at the Helm Station is all the controls for the Propulsion Motors, Planes, and Rudder.
  • The Planes/Rudder cannot be operated without one of or both Hydraulic Pumps on (reference the pictures for their location). If only one of the pumps is on the effectiveness of the planes/rudder is reduced, keep in mind the pumps do consume electricity and should be used sparingly. However, the planes/rudder do provide quick and effective control while moving.
  • It is suggested the Trim Pump be turned off while using the dive planes as the effectiveness of the planes can be reduced.
  • The Propulsion motors can be used to steer the craft either when moving or stationary and can allow the Aluminaut to be turned 360 degrees on it's axis.
  • Located to the right the Helmsman's seat is a switch that switches the throttle's operation between either resetting or holding it's position/"sticky".

SURFACING:

-Shot Ballast:
  • When surfacing drop approximately enough shot ballast so 1000+/- LBS pounds are remaining in the hoppers. This will provide enough positive buoyancy that Aluminaut will rise and still remain controllable. There is an 'auto stop' shot ballast button located on the pressure hull (reference the pictures for their location) that will stop the shot ballast dropping at a point when positive buoyancy is achieved.
-High Pressure Air:
*Note: It is advised that you reserve the use of high pressure air for when you are near or on the surface, as the flow of high pressure air can be difficult to control and can result in a uncontrollable ascent. Which in and emergency might be warranted.
  1. Switch the Port and Starboard Ballast Tank switches to the 'Blow'/On position.
  2. Then turn on the 'Main Ballast Tank' switch to the 'Open'/On position.
  3. When the ballast tanks are empty 'Shut'/Turn off the 'Main Ballast Tank Switch'
-Emergency Keel Block:
  • To release the Keel Block Turn on the "Emergency Ballast" switch and leave on for 5 seconds, (turning off the switch before the 5 seconds are reached 'resets' the 5 second countdown) the weight will be dropped and the 'Emergency Ballast' light will turn on. Be advised that dropping the keel block results in a rapid, uncontrollable ascent and renders the submersible useless for further operation and Aluminaut will need to be "respawned".

NOTES:
  • The bow hatch was in realife used only in dry dock, I included it for use as an emergency egress. Like the aft sail the space between the hatch and the deck cover fills with water upon diving. Fully laden, the sub rides pretty low in the water, opening this hatch while underway can result in flooding, YOU HAVE BEEN WARNED!
  • The pressure of water on the hatches, when submerged will prevent them from being opened.
  • Turning on the Vertical Motor disconnects control of the dive planes.
  • When surfaced ensure the Radio is set to VHF/Off otherwise the radio will not function. Once submerged switch to the Underwater Telephone/On.
  • When being towed to the dive site (which was the most common method of transport for Aluminaut) I suggest leaving all the Shot Ballast Hoppers and Ballast tanks empty.
  • To use the Remote Control Equipment located in the observation chamber the 'Local/Remote' switch at the Helmsman's station must be switched to 'Remote/On' and all required propulsion motors 'on'. The Remote Operator cannot control the dive planes.
  • You cannot operate the Manipulators and the Propulsion Motors simultaneously, one or the other must be switched off before the other can be used.

ENJOY!!!

P.S. This is the first ship I've ever created for this game. Any advice or criticisms you have please let me know in the comments below, so moving forward I can hopefully create better stuff.

UPDATE 04 JUL 2022:
- Improved responsiveness of the trim system
- Increased descent rate slightly
- Rebuilt Sonar System
- Visual changes to the Echo Sounder
71 Comments
GERUNIMO  [author] Feb 8 @ 2:39pm 
youngblood243, sure once I get it fixed I can post some instructions.
youngblood243 Feb 8 @ 2:18pm 
could you ever put instructions on how to start it up and what to press first cause i went in and it was amazing detail i just couldnt turn on the lights or start it properly lol
ʝιɱ ƚԋҽ ριʅσƚ Feb 5 @ 4:13pm 
alright
GERUNIMO  [author] Feb 5 @ 11:18am 
Jim the Pilot, I'm sorry no not yet. There is alot of issues I need to work out yet.
Space is a real problem with the addition of all the new plumbing required.
Thank you for your patience.
ʝιɱ ƚԋҽ ριʅσƚ Feb 4 @ 5:50am 
has it been fixed?
ʝιɱ ƚԋҽ ριʅσƚ Nov 8, 2023 @ 7:29pm 
alright thanks good to hear from a talented creator
GERUNIMO  [author] Nov 8, 2023 @ 7:19pm 
Jim the Pilot, I can and I will. In between the flow updates I've been plugging away at it.
Thanks for the continued interest!
ʝιɱ ƚԋҽ ριʅσƚ Nov 8, 2023 @ 4:17pm 
can u fix ballasts for new update
ʝιɱ ƚԋҽ ριʅσƚ Nov 8, 2023 @ 3:58pm 
it wont submerge
OliXava_niepytajok? Jun 10, 2023 @ 5:59am 
(non polish people may not understand the joke)