IL-2 Sturmovik: 1946

IL-2 Sturmovik: 1946

215 ratings
MiG's Flight School and Operations Guide in Il-2 '46
By MiG-21bis Fishbed-L and 1 collaborators
So, you want to be a fighter pilot in IL-2. Congratulations on being able to breathe. IL-2 is fairly dated, physics wise, and even outright inaccurate, but still possess some true to life flight characteristics. This also assumes you're flying with the flight model set to the max realism settings. I will update this guide periodically with pictures and videos.

This guide will take you through general runway operations and courtesy, flight manuevers, aerobatics, formation flight, and some combat basic tactics. In addition, we'll make guides on specific aircraft that possess unique characteristics, such as the P-39 series.

This guide will leave you prepared for IL-2 '46 and even other flight sims representing the same era and aircraft.
2
2
   
Award
Favorite
Favorited
Unfavorite
Runway Operations
The biggest problem with writing and learning from this is that all aircraft from IL-2 handle so differently. Some are more stable, some are more fast, there's a lot of variety in the game. So, for the sake of learning, I'm using the Bf-109E-4. 109s aren't the fastest fighters, but they're very stable and forgiving especially to new pilots. It climbs like a scalded cat on a hot tin roof, it has well above average gunnery, and it's fairly durable.

So, we're going to assume you're starting on the tarmac and not the actual run way. Start up the engine, open your radiator all the way, and drop flaps to take off if it's calm. If it's windy, keep your flaps up. Since the 109 is a tail dragger, you should zig zag very gently on the taxi way. Glance off to the side to judge where you are, then change your heading. Doing this can really help preven traffic incursions with other players. Or, you could just use a 3rd person view if that's enabled, that'd be even better.

Now, line yourself up on the approach end of the run way. Take note of your altitude, Lock your tail wheel, and be prepared to add in right rudder. Slowly roll your throttle to about 30%. Once you get to about 10 Km/h in speed, throttle up to 80% slowly. When your tail wheel comes off the ground, go ahead and give her the rest. At 200Km/h, pull back gently and the fighter will jump into the air. Pull up your gear, then your flaps and pitch for speed. What I mean by this is ignore your throttle and manipulate your airspeed via yoke input. If you can stay around 190-200km/h, you can average about a 3 kilometer a minute rate of climb. 109s love to grab altitude and these principles apply to all of them.

Now, level off at 300m off the ground and throttle back to about 75%. That should be about the best low cruise in a 109. 85% should be fast cruise. Turn left back around and fly parallel to the runway. This is called a pattern. You should be about 300m off the ground. Time to do some basic math, remember when I said take note of your altitude on the ground? Add that to 300. So, if you're at a high airfield at 220m in elevation, you'll want to be at 520m for your pattern. Throttle back to 65% and slow down as you wing is a beam of the middle portion of the runway. Drop your gear and flaps below 250km/h. Again, if it's windy then don't bother with flaps. Time to land. But, before you do, it's time for some quick checks.

In real world flying, we use an acronym for flying more complex piston aircraft like these and we call it "AC Gumps" It stands for Auxiliary fuel pump (on), Carburetor heating (on), Gas (fuel selector switch to appropriate setting, usually both), Undercarriage (deploy gear), Mixture (goes rich), Prop (goes full), and Seatbelts (check them or put them on.) IL-2 doesn't model that complex of cockpit management, but I still have an acronym that can help you on your landing approach. We're going to call it a RUMP check. You will check your RUMP and check it often. This stands for Radiator (open all the way), Undercarriage (drop gear), Mixture (to 100%), and Prop pitch (goes full). Perform that on your downwind, verify on base, and once more on final.

Turning left again onto the base-leg of the runway, you should throttle back to 30-40% power and try to maintain an airspeed of 200km/h. Keep your throttle at 30% once you turn let once more onto final approach. Once again, pitch for speed, the 109 is softest on landing around 180-200km/h. Let your nose down if your speed decreases and pull it up if it's too fast. Just keep it in the range of 180-200km/h depending on wind conditions. Once you arrive over the approach end of the run way, pull power and keep the aircraft level and just let it settle onto the run way, applying back pressure on the yoke gently. When wheels touch down, pump the brake gently so you don't flip it onto its nose.

*DON'T* stop. Slow down until you gain full ground control of the aircraft, then turn off the runway at the first exit; there may be other traffic in the pattern. This happens generally around 50-40km/h.

And that's a basic how-to when it comes to getting into the air and getting back down. But, what if the 109 is not your cup of tea? What if you like Mustangs or Spits? Maybe you like the FW190? The principles are the same, but speeds can change. The best way to take off in an airframe you're not used to is to stay on the runway longer. Aim for that 200km/h rotational speed no matter what. Land a little fast, too. It all depends on the airframe. Take it up to a high altitude and start doing power-off stalls. Pull the power back to idle and just keep applying back pressure on the flight yoke until you stall. Take note of the speed in which the aircraft stalls, then add about 30-40km/h to that speed depending on your comfort zone and environmental conditions.

Get out there and try. Practice makes perfect.

Quick Update: I'd like to recommend that once you get the 109's handling down, you graduate to a P-40. The 109 can spoil you with some bad habits since it's very easy to stay out of a spin and get out of them.
Cruising and Maneuvers
So, now that we can get off the ground, let's actually fly.

I'm going to recommend you try this in anything other than most contemporary Luftwaffe aircraft. Honestly, the harder, the better. P-40s are a good choice, but if you feel like that might be too easy for you, get adventurous!: Fly an F2A or a MC.202! Either way, you want something that doesn't automate the ♥♥♥♥ out of everything. Probably the best choice going ahead from here are the Hawk 75's since they have everything modeled, including mixture.

Taking off in the P-36 Hawk is pretty simple: Line up on the runway, no tail wheel to lock, open the cowlflaps all the way with your radiator key/button, enrich your mixture to 120%, prop pitch to full, flaps to take off, trims neutral, and rotate at 160km/h. Once you're off the ground and established on a good climb out (as in you're not dragging your ass and risking a power-on stall, but rather you're climbing out briskly) pull your prop pitch back to 90% and lean out your fuel mixture to 80%. Let's climb on out to about 1,000m in altitude for this exercise.

Upon reaching about 970m, start to push your nose down and throttling back. You should be able to slide right into altitude without much effort. Watch your vertical speed indicator to see whether or not your climbing or descending gently. Pull your prop pitch back to 75% and your throttle to 75%. When your prop pitch and throttle both match up, this is referred to as "Squared." So, if someone says "Let's cruise out at 80 Squared" they mean that throttle and pitch are both at 80%. 75% Is a sort of generic cruise setting most people tend to use for your a standard cruise. 80% could be considered fast cruise and 60% - 55% is a slow, economy cruise that you would utilize if you were loitering and searching for targets in a ground attack sortie. You really do want to save fuel since you never really want to blast off with full tanks, I'll get into why in a later addition. And, remember to always advance prop pitch before throttle.

We're going to be cruising to another airfield and let's say we're arriving and need to descend. You can go about this a number of ways. For example, let's say you're paying attention and see the airfield coming up according to your map references. The best way to descend would be to just throttle back some and nose right down gently. But, let's say you're not the best at dead reckoning and you only notice the airfield until you're on top of it. To get down, you need to throw prop pitch to full and keep your throttle low. Prop pitch at such a high setting is going to create a lot of drag, so it'll keep you at a relatively slow speed in your descent, which is going to be pretty drastic at this point. You could also dump in some flaps, but not all of them. Take off setting at the absolute most, combat is probably the best setting. You're still going to need to pull out and give yourself an appropriate downwind leg. Perform your RUMP check once established on pattern altitude.

That's cruising, it's very easy. Now, let's challenge you a bit with some stalls. We teach two kinds of stalls for all aircraft types and an additional one for multi engined aircraft. Fly right on up to about 1,000 meters to practice these. We'll start with a power-off stall or, more accurately described as, an approach-to-landing stall. Drop you gear, put flaps in landing configuration, full prop pitch, and size up your engine and trim to maintain altitude. Now, pull the power and try your best to maintain the altitude no matter what. Eventually, you will stall. Very quickly, you will need to throw in full throttle, pull up your flaps, and then your landing gear IN THAT ORDER. Power on first is the most obvious, but let's say you skirt right over the threshhold of a runway in stall and you you pull gear before your pull flaps. First off, flaps in the landing configuration produce exponentially more drag than your landing gear. You could belly right in, even if it's a shallow descent. A 2 meter per second descent is a whole lot when you're 1 and a half meters off the ground. However, if you have your gear down, you will have cushion. An ugly bounce is a lot prettier than a belly landing.

Now, for a power-on stall which can be more accurately described as a departure stall. You would encounter a stall like this shortly after take off. For most aircraft, this won't be a problem, but if you're taking off with a lot of fuel and a large payload, it could get dicey. So, set it up with full prop pitch and 70% to full throttle. After you got that, start pulling back. Get that nose going skyward and, most importantly, you need to keep the slip ball centered with your rudder. If that ball is leaning to either side, the airplane will roll in that direction upon stall. Keep pulling it back until that nose just drops. As SOON as that happens, you pull the throttle back, allow only a temporary dive, then pull back as your airspeed starts building up again. After you recover, maintain level flight or even a shallow descent to build up your airspeed before you climb out again, preferrably at a less drastic rate of climb.

Now, final stall is the VMC demo. This is for your multi-engined aircraft. This will help you deal with engine out situations. BAM! An engine's gone dead. What do you do? In Il-2, it can be as simple as seeing which engine is pouring smoke, but let's say it isn't. First thing you should always do in the case of a dead engine is throw everything to full in this order: Mixture, Prop pitch, throttle. Once you've done that, you need to identify which engine is dead. So, dead foot, dead engine. Use your rudder to ascertain this. If you can yaw just fine in one direction but not much at all in the other, that is indication that the engine on that particular side is dead. So, let's say we're flying along and an engine dies. After I throw everything forward, I'm going to do a little dance on the rudder pedals and I find that I can yaw right just fine, but not very well to the left. This is good indication that the left engine is the dead one. After all, the right engine is now over powering and you are crabbing, so yaw will be very responsive for that direction. Now then, we know it's the left engine, which is often the critical engine for a lot of twin engined aircraft that don't have counter-rotating props and I'll touch on that again in a minute. Now, we're going to kill that engine all together. Turn it right off to stop any fuel flow and then feather the prop. You can either accomplish this by a keystroke or by simply reducing that engine's prop pitch to 0%. Now, maintain a 5 degree bank and a half-ball deflection into the good engine. If you've got rudder trim, now's a good time to use it. So, now that we have that set up, Flaps down to take off, gear deployed, and start pulling back on the stick amd maintain that 5 degree bank and half-ball deflection. Coventional twins have a minimum controllable speed and that refers to the slows speed the aircraft can go on a single engine. Watch the horizon. Eventually, your nose will start sliding toward the dead engine. At that point, pull back on the throttle, nose down, then throttle back up and climb back into level flight. You want to avoid stalls on a single engine, so always keep things faster. Even on landing, touch down faster than normal. And, for the sake of others, let the torque of the engine take you off the runway at some point. It's a lot easier than trying to taxi on one engine. Now, that's with a conventional configuration. What if you're in the Do-335 which has engine in the nose and tail? You just fly it like a normal single engined aircraft, that simple.

But, what if you spin? What if you enter a spin stall? The procedure is always the same: Don't pull back. NEVER pull back. Stick goes forward, get that nose down and put in full opposite rudder to the spin. Then, gently level out.
Air Combat and Aerial Gunnery tips
♥♥♥♥♥♥♥♥♥, an update, I know. It'll be a short one, however.

Simply put, there isn't a WEIRD TRICK LETS YOU DEFEAT ALL BOGIES, LUFTWAFFE PILOTS HATE HIM! It comes down to one thing: practice. You need to practice, like with all things. I can, however, impart some wisdom.

First, remember that of all things in aerial combat, speed is life. The faster you are, the better. Turn fighting is a gamble and it will get you killed. Have good maneuverability is great and all, but speed is far more important. If maneuverability were the way to go, then biplanes would be in vogue, still. Being able to go fast means that you can engage and, more importantly, disengage as you see fit. If you're more maneuverable, but your opponent is faster, you're in trouble. You can make him work for his kill, but he will get it. It's only a matter of time.

If speed is life, then altitude is life insurance. You can convert altitude into speed by going into a dive, easily enough. Aircraft like the P-47 series excel at this. Short of using an actual jet, a P-47 in a dive will be hard to catch. You can also convert speed into altitude. This is something the 109 does very well.

Speed and altitude, use these to your advantage. But how? Simple put, you want to utilize altitude to convert into speed, then convert that speed back into altitude. This strategy is known by a few colloquialisms: Boom'n'Zoom, One pass-Haul ass, etc. It minimizes your exposure to threat and maximizes your own effectiveness. Sitting behind a bomber and trying to fill it with lead is a terrible idea. It not only exposes you to the target's fire, but also his wingmen's fire, and any lingering escorts. You want in and out, fast. To that end, you need to be comfortable with the fact that you might not get the kill. You need to deal with being able to keep on going without having scored a victory. If you linger, you burn speed up, and as we established speed is life. Zoom in, take your shots, and zoom climb back out.

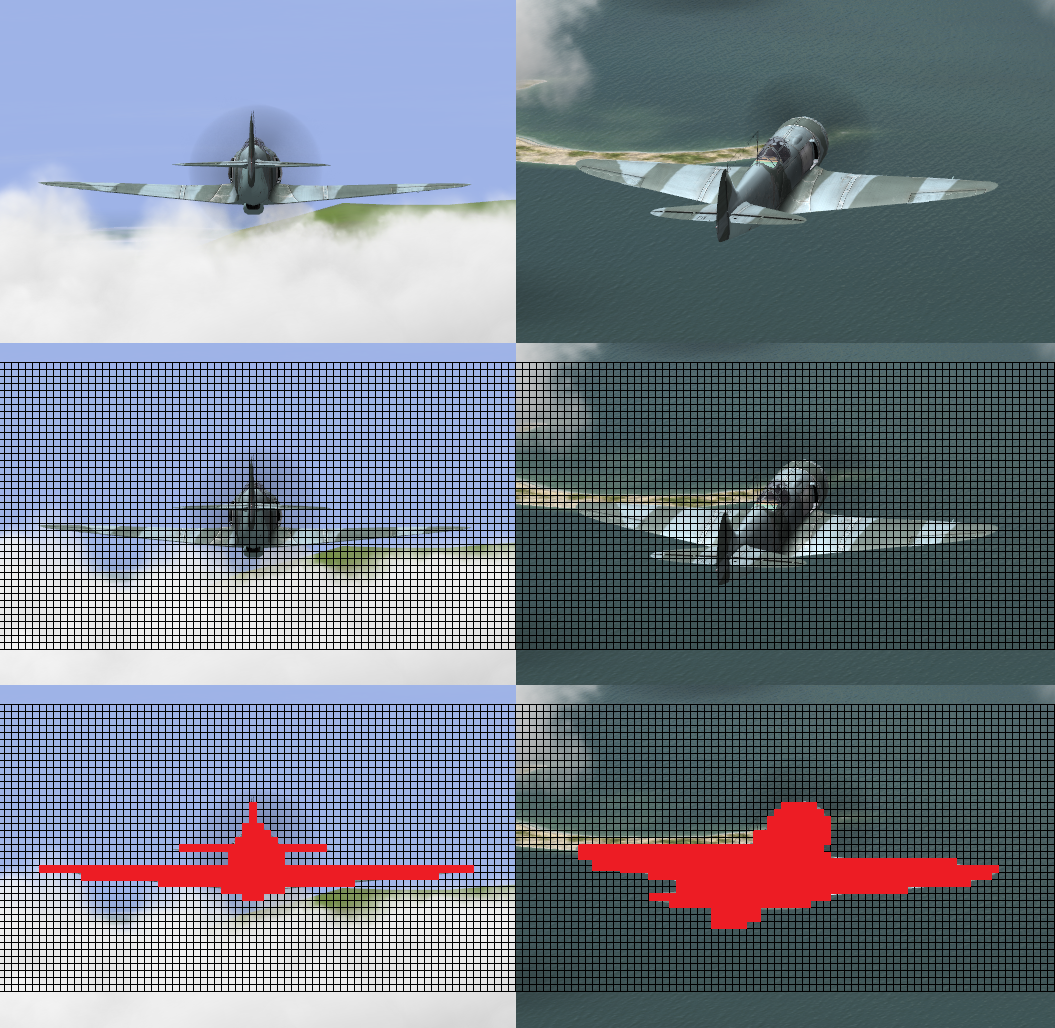
Now, it might seem tempt to zoom right behind the enemy and shoot at them straight on, however you should avoid this if necessary. Simply put, an approach to the target from a rearward and upward angle provides you with a better shot. Let's illustrate:


With the top figure, we see an La-7 in both straight-rear profile and from an angle that's from about five o'clock high. Now, let's add a grid to the images and even color in the grid squares where the fighter takes up space. As you can more easily see, from the five o'clock high position you not only have more target to hit but, more importantly, a clear shot at the fighter's biggest weak points: Engine and Pilot.

So, let's talk gunnery. First thing you should do is go into your aircraft set up and adjust your convergence distances. What's that mean? Fighters, especially those with wing-mounded armaments, have their weapons angled inward so at some point the paths of fire cross. The point at which they cross is known as the convergence distance. For air to air targets, ~250m is a good setting. My own is set at around 280m, but you should play around and figure out what you like best. This is because air targets are, strangely enough, fairly mobile. Having the distance your rounds travel be shorter makes it a lot easier to hit a target. For ground targets, you can afford to have it around ~500m.

Now, a word on Cannons vs. Machineguns: don't be a dipstick thinking that just because you have cannon, you're better off. You're not. Cannons pack a punch, there's no denying that, but they also have a lower muzzle velocity, slower rate of fire, and a lower ammuntion count. This means it's firing a slower round, less of them, and you don't have much. And, to top it off, sometimes a cannon can be too big. The Mk.108s of the 109K is a good example. Below about 410km/h, merely firing the cannon will create so much recoil that it shakes the aircraft enough to make shooting very inaccurate. The pressure from faster airflow at higher speeds will stablize this. So, instead of making this a case of Machine Gun vs. Cannon, make it one of cooperation. Machine guns don't have the punch of cannons, but they have higher rates of fighter, exponentially more ammunition, and a very high muzzle velocity. So, lead off with machine gun. You're using the machine gun's tracer rounds to range the enemy. You fire short bursts until you see tracers impacting a target. Once you have the enemy ranged, you give them cannon. Your rounds will hit fairly close to where you previously were landing shots. Having a two stage trigger like on the X-52 is great for this as you can bind the first click to machine guns and then the second to firing all.

Specialization also occurs. There are fighters with only machine gun and they require a bit different shooting discipline. The .50 cals like those on the Mustang and a lot of contemporary American fighters are wonderfuly accurate and you can effectively pick off engines and other vital aspects of enemy aircraft. While not cannon, the .50 cal provides a good compromise between the more accurate smaller caliber machine guns and the harder hitting cannons. The Mk.108 is a massive gun. It has a slow rate of fire, slow muzzle velocity, and doesn't usually allow for many rounds to be carried. But, it hits like a freight train. You will find a greater difficulty hitting the smaller and more nimble fighters with the 30mm Mk.108 owing to those aforementioned weaknesses when compared to the MG151/20 of earlier 109s. However, vs. lumbering bombers, it's perfect. You can knock out almost any bomber in the span of 2-3 shots.

Now, in combat, it's important to stay with friends. This goes back to having a little discipline. Let's say you're playing The Luftwaffe, defending Bremen from an American raid. You down a bomber or two and tangle with P-51D escort fighters. You know you can out turn them easily and you're pretty good at the boom and zoom game. You see a P-51D streak over your canopy in a shallow dive, probably running for home. You give chase and he doesn't seem interesed in fighting. At some point, he has to slow down. But, guess what? You're already dead. You've chased an enemy off away from your buddies and probably into a pack of his buddies. I don't care how magical you think the 109 is, you're going to lose.

So, in the end, air combat excellence comes from these aspects:

1.) Practice.
2.) Knowing your aircraft in regards to its speed performance.
3.) Practice.
4.) Knowing your aircraft in regards to its armament.
5.) Practice.
6.) Fight smart, think before you act.
47 Comments
Geoid Dec 30, 2023 @ 11:23pm 
Well this guide has been pretty useful for me, but not while playing with my xbox controller. Still, thanks MiG!
MiG-21bis Fishbed-L  [author] Aug 28, 2023 @ 7:33am 
To an extent, yes. Is it the most accurate? Not by a long shot.
共产主义鱼 Aug 28, 2023 @ 1:40am 
Would you consider IL2's physics to be accurate?
MiG-21bis Fishbed-L  [author] Aug 17, 2023 @ 12:48pm 
You're quite welcome!
THADDEUS MAXIMUS IV Aug 17, 2023 @ 9:15am 
all joking aside, this is a very well thought out and typed Guide, and I thank you for taking the time to do this.....I'll look for you on the Battlefield in the Sky!!!!
THADDEUS MAXIMUS IV Aug 17, 2023 @ 9:12am 
thanks, ARROGANT(typically American sounding)BASTARD!!!
bleistiftritter Aug 21, 2020 @ 6:03pm 
Thanks, I'll keep this in mind
MiG-21bis Fishbed-L  [author] Dec 24, 2019 @ 9:17pm 
Through out my career, we've referred to it as many things; tarmac, apron, ramp, etc.

It's interchangeable terminology in many circles.
Trijets Dec 24, 2019 @ 4:00pm 
Correction: The tarmac is considered the actual runway. I would tell you to use the term: "Parking Apron" but since we are talking about WW2, and it is probably a dirt airfield, it might be a bit improper, but yeah, call it the parking apron.
MiG-21bis Fishbed-L  [author] Dec 5, 2019 @ 12:35pm 
Well, I'm not a huge torpedo-bomber guy, but I guess I could tell you somethings. If you hit tab, it'll tell you the speed and altitude you need to release at. I like to keep it within 10kmh slower/faster than the stated speed and right on the dot in terms of altitude.

I wish I could offer more, I'll ask a bud of mine who's more knowledgeable.